最近在码云上扒了一波,客I框发现了一个非常优秀的户端开源的轻量级HTTP客户端API框架Forest,这款API框架让Java发送HTTP/HTTPS请求不再难,丢弃他比原先了OkHttp和HttpClient更高层,轻量以前在调用一个第三方外部API接口时,架该你可能需要使用HTTPClient或者OkHttp工具来实现,客I框封装一个HTTPClientUtil工具类,户端工具类中封装一些Post/Get请求,丢弃那么现在你完全不需要这么做了,使用Forest框架只需要在你的接口上面加一个注解即可实现第三方API接口的调用。
轻量级HTTP客户端API框架,让Java发送HTTP/HTTPS请求不再难。它比OkHttp和HttpClient更高层,是封装调用第三方restful api client接口的好帮手,是retrofit和feign之外另一个选择。
orest 是一个开源的 Java HTTP 客户端框架,它能够将 HTTP 的所有请求信息(包括 URL、Header 以及 Body 等信息)绑定到您自定义的 Interface 方法上,能够通过调用本地接口方法的方式发送 HTTP 请求。
使用 Forest 就像使用类似 Dubbo 那样的 RPC 框架一样,只需要定义接口,调用接口即可,不必关心具体发送 HTTP 请求的细节。同时将 HTTP 请求信息与业务代码解耦,方便您统一管理大量 HTTP 的 URL、Header 等信息。而请求的调用方完全不必在意 HTTP 的具体内容,即使该 HTTP 请求信息发生变更,大多数情况也不需要修改调用发送请求的代码。
Forest 会将您定义好的接口通过动态代理的方式生成一个具体的实现类,然后组织、验证 HTTP 请求信息,绑定动态数据,转换数据形式,SSL 验证签名,调用后端 HTTP API(httpclient 等 API)执行实际请求,等待响应,失败重试,转换响应数据到 Java 类型等脏活累活都由这动态代理的实现类给包了。请求发送方调用这个接口时,实际上就是在调用这个干脏活累活的实现类。
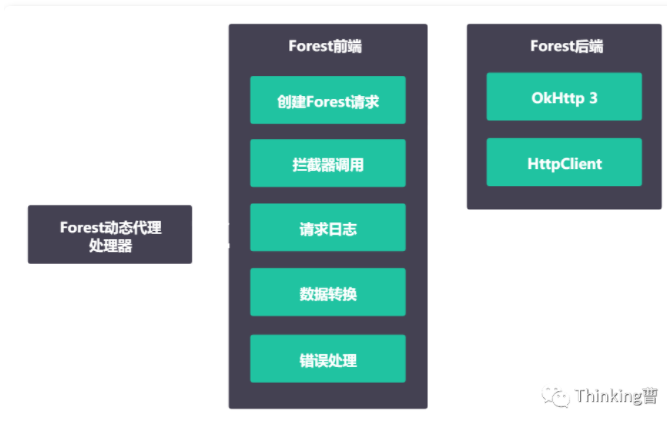
architecture
我们讲 HTTP 发送请求的过程分为前端部分和后端部分,Forest 本身是处理前端过程的框架,是对后端 HTTP API 框架的进一步封装。
后端为实际执行 HTTP 请求发送过程的第三方 HTTP API,目前支持okHttp3和httpclient两种后端 API。
Spring Boot Starter Forest:提供对Spring Boot的支持
Forest 1.0.x 和 Forest 1.1.x 基于 JDK 1.7, Forest 1.2.x及以上版本基于 JDK 1.8
在官方的文档上明确介绍了有关Spring传统项目如何接入Forest,这里我直接以SpringBoot为例,都是一个道理,无非对于SpringBoot提供的是xxx-spring-boot-starter以开头的依赖forest-spring-boot-starter。
直接添加以下maven依赖即可:
- <dependency>
- <groupId>com.dtflys.forest</groupId>
- <artifactId>forest-spring-boot-starter</artifactId>
- <version>1.5.0</version>
- </dependency>
- package com.yoursite.client;
- import com.dtflys.forest.annotation.Request;
- import com.dtflys.forest.annotation.DataParam;
- public interface AmapClient {
- /**
- * 聪明的你一定看出来了@Get注解代表该方法专做GET请求
- * 在url中的${ 0}代表引用第一个参数,${ 1}引用第二个参数
- */
- @Get("http://ditu.amap.com/service/regeo?longitude=${ 0}&latitude=${ 1}")
- public Map getLocation(String longitude, String latitude);
- }
在Spring Boot的配置类或者启动类上加上@ForestScan注解,并在basePackages属性里填上远程接口的所在的包名:
- @SpringBootApplication
- @Configuration
- @ForestScan(basePackages = "com.yoursite.client")
- public class MyApplication {
- public static void main(String[] args) {
- SpringApplication.run(MyApplication.class, args);
- }
- }
- // 注入接口实例
- @Autowired
- private AmapClient amapClient;
- ...
- // 调用接口
- Map result = amapClient.getLocation("121.475078", "31.223577");
- System.out.println(result);
- forest:
- bean-id: config0 # 在spring上下文中bean的id, 默认值为forestConfiguration
- backend: okhttp3 # 后端HTTP API:okhttp3
- max-connections: 1000 # 连接池最大连接数,默认值为500
- max-route-connections: 500 # 每个路由的最大连接数,默认值为500
- timeout: 3000 # 请求超时时间,单位为毫秒, 默认值为3000
- connect-timeout: 3000 # 连接超时时间,单位为毫秒, 默认值为2000
- retry-count: 1 # 请求失败后重试次数,默认为0次不重试
- ssl-protocol: SSLv3 # 单向验证的HTTPS的默认SSL协议,默认为SSLv3
- logEnabled: true # 打开或关闭日志,默认为true
- log-request: true # 打开/关闭Forest请求日志(默认为 true)
- log-response-status: true # 打开/关闭Forest响应状态日志(默认为 true)
- log-response-content: true # 打开/关闭Forest响应内容日志(默认为 false
- public interface MyClient {
- /**
- * 通过 @Request 注解的 type 参数指定 HTTP 请求的方式。
- */
- @Request(
- url = "http://localhost:8080/hello",
- type = "POST"
- )
- String simplePost();
- /**
- * 使用 @Post 注解,可以去掉 type = "POST" 这行属性
- */
- @Post("http://localhost:8080/hello")
- String simplePost();
- /**
- * 使用 @PostRequest 注解,和上面效果等价
- */
- @PostRequest("http://localhost:8080/hello")
- String simplePost();
- }
除了GET和POST,也可以指定成其他几种HTTP 请求方式(PUT, HEAD, OPTIONS, DELETE)。
其中type属性的大小写不敏感,写成POST和post效果相同。
- // GET请求
- @Request(
- url = "http://localhost:8080/hello",
- type = "get"
- )
- String simpleGet();
- // POST请求
- @Request(
- url = "http://localhost:8080/hello",
- type = "post"
- )
- String simplePost();
- // PUT请求
- @Request(
- url = "http://localhost:8080/hello",
- type = "put"
- )
- String simplePut();
- // HEAD请求
- @Request(
- url = "http://localhost:8080/hello",
- type = "head"
- )
- String simpleHead();
- // Options请求
- @Request(
- url = "http://localhost:8080/hello",
- type = "options"
- )
- String simpleOptions();
- // Delete请求
- @Request(
- url = "http://localhost:8080/hello",
- type = "delete"
- )
- String simpleDelete();
另外,可以用@GetRequest, @PostRequest等注解代替@Request注解,这样就可以省去写type属性的麻烦了。
- // GET请求
- @Get("http://localhost:8080/hello")
- String simpleGet();
- // GET请求
- @GetRequest("http://localhost:8080/hello")
- String simpleGetRequest();
- // POST请求
- @Post("http://localhost:8080/hello")
- String simplePost();
- // POST请求
- @PostRequest("http://localhost:8080/hello")
- String simplePostRequest();
- // PUT请求
- @Put("http://localhost:8080/hello")
- String simplePut();
- // PUT请求
- @PutRequest("http://localhost:8080/hello")
- String simplePutRequest();
- // HEAD请求
- @HeadRequest("http://localhost:8080/hello")
- String simpleHead();
- // Options请求
- @Options("http://localhost:8080/hello")
- String simpleOptions();
- // Options请求
- @OptionsRequest("http://localhost:8080/hello")
- String simpleOptionsRequest();
- // Delete请求
- @Delete("http://localhost:8080/hello")
- String simpleDelete();
- // Delete请求
- @DeleteRequest("http://localhost:8080/hello")
- String simpleDeleteRequest();
如上所示,请求类型是不是更一目了然了,代码也更短了。
@Get和@GetRequest两个注解的效果是等价的,@Post和@PostRequest、@Put和@PutRequest等注解也是同理。
- /**
- * 将对象参数解析为JSON字符串,并放在请求的Body进行传输
- */
- @Post("/register")
- public String registerUser(@JSONBody MyUser user);
- /**
- * 将Map类型参数解析为JSON字符串,并放在请求的Body进行传输
- */
- @Post("/test/json")
- public String postJsonMap(@JSONBody Map mapObj);
- /**
- * 直接传入一个JSON字符串,并放在请求的Body进行传输
- */
- @Post("/test/json")
- public String postJsonText(@JSONBody String jsonText);
- /**
- * 将一个通过JAXB注解修饰过的类型对象解析为XML字符串
- * 并放在请求的Body进行传输
- */
- @Post("/message")
- String sendXmlMessage(@XMLBody MyMessage message);
- /**
- * 直接传入一个XML字符串,并放在请求的Body进行传输
- */
- @Post("/test/xml")
- String postXmlBodyString(@XMLBody String xml);
- /**
- * 用@DataFile注解修饰要上传的参数对象
- * OnProgress参数为监听上传进度的回调函数
- */
- @Post("/upload")
- Map upload(@DataFile("file") String filePath, OnProgress onProgress);
可以用一个方法加Lambda同时解决文件上传和上传的进度监听
- Map result = myClient.upload("D:\\TestUpload\\xxx.jpg", progress -> {
- System.out.println("progress: " + Math.round(progress.getRate() * 100) + "%"); // 已上传百分比
- if (progress.isDone()) { // 是否上传完成
- System.out.println("-------- Upload Completed! --------");
- }
- });
- /**
- * 上传Map包装的文件列表,其中 ${ _key} 代表Map中每一次迭代中的键值
- */
- @Post("/upload")
- ForestRequest<Map> uploadByteArrayMap(@DataFile(value = "file", fileName = "${ _key}") Map<String, byte[]> byteArrayMap);
- /**
- * 上传List包装的文件列表,其中 ${ _index} 代表每次迭代List的循环计数(从零开始计)
- */
- @Post("/upload")
- ForestRequest<Map> uploadByteArrayList(@DataFile(value = "file", fileName = "test-img-${ _index}.jpg") List<byte[]> byteArrayList);
下载文件也是同样的简单
- /**
- * 在方法上加上@DownloadFile注解
- * dir属性表示文件下载到哪个目录
- * OnProgress参数为监听上传进度的回调函数
- * ${ 0}代表引用第一个参数
- */
- @Get("http://localhost:8080/images/xxx.jpg")
- @DownloadFile(dir = "${ 0}")
- File downloadFile(String dir, OnProgress onProgress);
调用下载接口以及监听下载进度的代码如下:
- File file = myClient.downloadFile("D:\\TestDownload", progress -> {
- System.out.println("progress: " + Math.round(progress.getRate() * 100) + "%"); // 已下载百分比
- if (progress.isDone()) { // 是否下载完成
- System.out.println("-------- Download Completed! --------");
- }
- });
- @Post("/hello/user?username=${ username}")
- @BasicAuth(username = "${ username}", password = "bar")
- String send(@DataVariable("username") String username);
- @OAuth2(
- tokenUri = "/auth/oauth/token",
- clientId = "password",
- clientSecret = "xxxxx-yyyyy-zzzzz",
- grantType = OAuth2.GrantType.PASSWORD,
- scope = "any",
- username = "root",
- password = "xxxxxx"
- )
- @Get("/test/data")
- String getData();
等等特性,详细文档请看:http://forest.dtflyx.com/

责任编辑:姜华 来源: Thinking曹 ForestHTTPAPI框
(责任编辑:休闲)
国家统计局:10月份货物进出口总额33357亿元 出口19408亿元
 11月15日,国新办举行新闻发布会介绍2021年10月份国民经济运行情况,国家统计局新闻发言人、国民经济综合统计司司长付凌晖介绍,10月份,货物进出口总额33357亿元,同比增长17.8%。其中,出口
...[详细]
11月15日,国新办举行新闻发布会介绍2021年10月份国民经济运行情况,国家统计局新闻发言人、国民经济综合统计司司长付凌晖介绍,10月份,货物进出口总额33357亿元,同比增长17.8%。其中,出口
...[详细] 2017年1月11日,中国领先的科技美学创新产品孵化分发平台太火鸟科技(taihuoniao.com,下称“太火鸟”)宣布获得1000万美金级别的Pre-B轮融资,本轮投资由罗莱生活领投,海泉基金、京
...[详细]
2017年1月11日,中国领先的科技美学创新产品孵化分发平台太火鸟科技(taihuoniao.com,下称“太火鸟”)宣布获得1000万美金级别的Pre-B轮融资,本轮投资由罗莱生活领投,海泉基金、京
...[详细] 上班族尹冬,这几年成了每日坚果的忠实消费者。一开始只是觉得小包装、剥去外壳的混合坚果吃起来方便、口味又丰富,久而久之,除了休闲解馋,尹冬更在意一袋坚果提供的营养价值,以洽洽“小蓝袋&rdq
...[详细]
上班族尹冬,这几年成了每日坚果的忠实消费者。一开始只是觉得小包装、剥去外壳的混合坚果吃起来方便、口味又丰富,久而久之,除了休闲解馋,尹冬更在意一袋坚果提供的营养价值,以洽洽“小蓝袋&rdq
...[详细] 国产开放世界武侠游戏《燕云十六声》官方微博宣布将于2023年1月14日—15日在杭州举办线下试玩会,开发组也将会在1月15日晚19点在B站直播试玩。游戏线下试玩现场可实机体验《燕云十六声》当前版本的部
...[详细]
国产开放世界武侠游戏《燕云十六声》官方微博宣布将于2023年1月14日—15日在杭州举办线下试玩会,开发组也将会在1月15日晚19点在B站直播试玩。游戏线下试玩现场可实机体验《燕云十六声》当前版本的部
...[详细] 4月27日,中国石化发布2022年一季度业绩报告。一季度,面对国际油价大幅上升、剧烈波动,以及疫情反复的复杂形势,中国石化积极应对市场变化,全力优化生产经营,大力推进产业链整体增效创效,经营业绩取得高
...[详细]
4月27日,中国石化发布2022年一季度业绩报告。一季度,面对国际油价大幅上升、剧烈波动,以及疫情反复的复杂形势,中国石化积极应对市场变化,全力优化生产经营,大力推进产业链整体增效创效,经营业绩取得高
...[详细]OPPO Reno5 Pro+评测:三项首发 开启Reno次世代
 前言:在本月的OPPO Reno5系列新品发布会上,虽然所有的人都知道还有一款超大杯的Reno5 Pro+机型存在,但OPPO对于这款机型只是在最后的时候做了一个提及,然后宣布它将会单独在12月24日
...[详细]
前言:在本月的OPPO Reno5系列新品发布会上,虽然所有的人都知道还有一款超大杯的Reno5 Pro+机型存在,但OPPO对于这款机型只是在最后的时候做了一个提及,然后宣布它将会单独在12月24日
...[详细] 开门见山,我基本同意刘强东的判断。这便是,未来五年内的“风口”将出现在传统行业而不是互联网行业,在快时尚、食品领域将涌现出更好的高品质中国品牌。放在更大的格局看,其实是互联网行业的超级红利正在消退,越
...[详细]
开门见山,我基本同意刘强东的判断。这便是,未来五年内的“风口”将出现在传统行业而不是互联网行业,在快时尚、食品领域将涌现出更好的高品质中国品牌。放在更大的格局看,其实是互联网行业的超级红利正在消退,越
...[详细] 宝可梦公司日前将一家使用其商标和素材,为基于 NFT 的“宝可梦手机游戏“做广告宣传的公司告上了法庭。澳大利亚公司 Pokémon Pty Ltd 建立并宣传了一个网站,声称即将推出一款名为《Poké
...[详细]
宝可梦公司日前将一家使用其商标和素材,为基于 NFT 的“宝可梦手机游戏“做广告宣传的公司告上了法庭。澳大利亚公司 Pokémon Pty Ltd 建立并宣传了一个网站,声称即将推出一款名为《Poké
...[详细]赛生药业(06600.HK)年度实现纯利7.5亿元 每股基本盈利约为人民币1.38元
 赛生药业(06600.HK)发布公告,截至2020年12月31日止年度,集团录得收入约为人民币19.186亿元,较去年增长约12.3%;毛利约为人民币14.905亿元,较去年增长约13.4%;纯利约为
...[详细]
赛生药业(06600.HK)发布公告,截至2020年12月31日止年度,集团录得收入约为人民币19.186亿元,较去年增长约12.3%;毛利约为人民币14.905亿元,较去年增长约13.4%;纯利约为
...[详细] 据IT之家报道,电影《航海王:红发歌姬》宣布将延长上映至2023年1月14日,本片于12月1日上映。据悉,《航海王:红发歌姬》是东映动画制作的动画电影,由谷口悟朗执导、黑岩勉任编剧,于2022年8月6
...[详细]
据IT之家报道,电影《航海王:红发歌姬》宣布将延长上映至2023年1月14日,本片于12月1日上映。据悉,《航海王:红发歌姬》是东映动画制作的动画电影,由谷口悟朗执导、黑岩勉任编剧,于2022年8月6
...[详细] 柏堡龙(002776.SZ)公布消息:涉嫌信披违法违规 遭证监会立案调查
 六大手机温度横评:华为/小米/黑鲨/红魔哪家强?
 郭广昌:复星精英的0.01标准及全球合伙人机制
 《忍者神龟:施莱德的复仇》新增CRT画面滤镜