想了解更多关于开源的内容,请访问:

51CTO 开源基础软件社区

https://ost.51cto.com

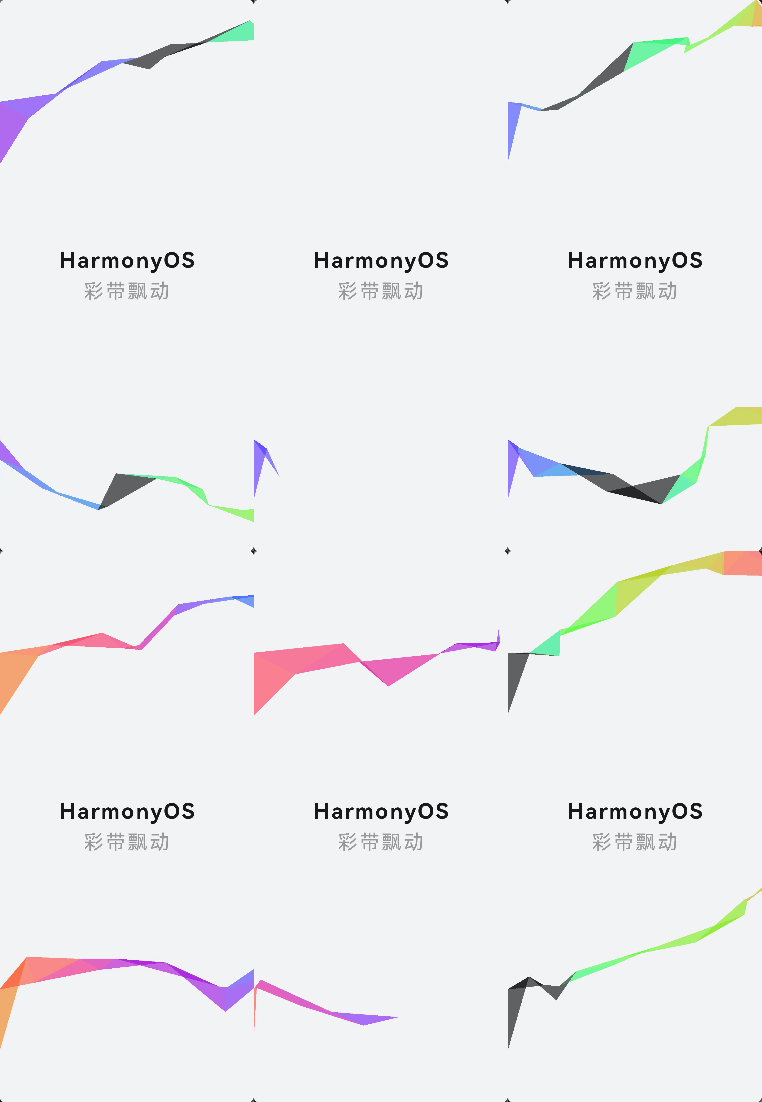
最近在网上购物是经常看到一个彩带飘动的特效,又恰逢最近在学习HarmonyOS开发的知识,便想着自己能否用HarmonyOS相关的知识也做一个类似的东西,于是就自己动手尝试了一下。

彩带飘动特效,主要是使用canvas来实现的,设置三角形的两个初始的点,在随机生成第三个点,并绘制三角形,生成随机颜色,填充三角形。然后在循环调用这个方法,直到三角形的点的x轴的值大于画布的宽度加上三角形的宽度。
<div class="container" >
<div class="wrapper">
<text class="title">HarmonyOS</text>
<text class="author">彩带飘动</text>
</div>
<canvas width="1920" height="917" ref="streamer" @click="clickBtn" @touchmove="clickBtn"></canvas>
</div>
.container {
display: flex;
flex-direction: column;
justify-content: center;
align-items: center;
left: 0px;
top: 0px;
width: 100%;
height: 100%;
}
.wrapper{
width: 100%;
text-align: center;
display: flex;
flex-direction: column;
justify-content: center;
}
.title {
width: 100%;
font-size: 60px;
font-weight: 700;
letter-spacing: 6px;
}
.author{
width: 100%;
font-size: 56px;
font-weight: normal;
color: #999;
letter-spacing: 6px;
margin-top: 20px;
}
canvas {
position: absolute;
top: 0;
left: 0;
z-index: 0;
width: 100%;
height: 100%;
pointer-events: none;
}(1)获取canvas元素,设置canvas 元素的宽高,以及canvas 2d 的缩放比例,圆形透明度,窗口宽高。
(2)擦除之前的绘制内容,然后设置初始的三角形的两个角的位置坐标,将坐标放进path数组里,然后调用绘制方法draw(),将path的数值传进draw()里,然后就调用draw方法,一直到图形宽度等于或者大于窗口宽度时结束。第二个彩带同理。
(3)绘制方法实现,将path里的两个点作为起始点和终点,然后再生成一个随机的点,将该点作为三角形的第三个点,绘制成三角形。然后随机生成颜色,将颜色填充进三角形中,再然后将path里的终点作为下一次的起始点,将随机生成的点作为下一次的终点,放进path数组里。需要注意的是随机生成的点的,y轴坐标要大于0小于画布的高度。
(4)生成随机的颜色填充图形,使用cos函数乘以128再加上128,随机生成一个0-256之间的数,然后向左移动16位,在用同样的方法生成2个0-256之间的数,一个向左移动8位,最后将三个随机值拼接在一起转为16进制即可。
export default {
data: {
title: "",
height: 0,
width: 0,
RIBBON_WIDE: 90,//彩带宽度
r: 0,
dpr: 1,//像素值
path: null,
},
onInit() {
this.title = "Hello World";
},
onShow(){
this.clickBtn();
setInterval(() => {
this.clickBtn();
}, 2000);
},
clickBtn() {
const el = this.$refs.streamer;
const ctx = el.getContext("2d"); // 获取canvas 2d上下文
this.width = 780; // 设置窗口的文档显示区的宽高
this.height = 1600;

el.width = this.width * this.dpr;
el.height = this.height * this.dpr;
ctx.scale(this.dpr, this.dpr); // 水平、竖直方向缩放
ctx.globalAlpha = 0.6; // 图形透明度
this.init(ctx);
},
init(ctx) {
ctx.clearRect(0, 0, this.width, this.height); // 擦除之前绘制内容
this.path = [
{
x: 0, y: this.height * 0.7 + this.RIBBON_WIDE
},
{
x: 0, y: this.height * 0.7 - this.RIBBON_WIDE
},
{
x: 0, y: this.height * 0.2 + this.RIBBON_WIDE
},
{
x: 0, y: this.height * 0.2 - this.RIBBON_WIDE
},

];
setInterval(() => {
if ((this.path[1].x < this.width + this.RIBBON_WIDE)) {
this.draw(this.path[0], this.path[1], ctx);
}
}, 300);
setInterval(()=>{
if ((this.path[3].x < this.width + this.RIBBON_WIDE)) {
this.draw(this.path[2], this.path[3], ctx);
}
},500);
},
draw(start, end, ctx) {
ctx.beginPath(); // 创建一个新的路径
ctx.moveTo(start.x, start.y); // path起点
ctx.lineTo(end.x, end.y); // path终点
var nextX = end.x + (Math.random() * 2 - 0.25) * this.RIBBON_WIDE,
nextY = this.geneY(end.y);
ctx.lineTo(nextX, nextY);
ctx.closePath();
this.r=this.r-(Math.PI * 2 / (-50));
// 随机生成并设置canvas路径16进制颜色
ctx.fillStyle =
"#" +
(
((Math.cos(this.r) * 127 + 128) << 16) |
((Math.cos(this.r + (Math.PI*2) / 3) * 127 + 128) << 8) |
(Math.cos(this.r + ((Math.PI*2) / 3) * 2) * 127 + 128)
).toString(16);

ctx.fill(); // 根据当前样式填充路径
this.path[0] = this.path[1]; // 起点更新为当前终点
this.path[1] = {
x: nextX, y: nextY
}; // 更新终点
},
geneY(y) {
var temp = y + (Math.random() * 2 - 1.1) * this.RIBBON_WIDE;
return temp > this.height || temp < 0 ? this.geneY(y) : temp;
}
}以上就是我实现签名效果的全部内容,最终效果如动图所示。虽然样式、逻辑以及功能上可能比较简陋,但是目前已经实现了彩带特效的基本功能,后续我会继续做出更多的特效。希望本次内容能够对大家有所帮助。
想了解更多关于开源的内容,请访问:
51CTO 开源基础软件社区
https://ost.51cto.com。
责任编辑:jianghua 来源: 51CTO开源基础软件社区 ArkUI鸿蒙(责任编辑:娱乐)
节能元件(08231.HK)年度由亏转盈64.6万美元 每股盈利0.04美仙
 节能元件(08231.HK)公告,截至2020年12月31日止年度,公司收入2110万美元,同比增长17.2%;公司拥有人应占溢利64.6万美元,上年同期亏损142.5万美元;每股盈利0.04美仙。收
...[详细]
 如果认为5G技术被夸大,那么可以等待5.5G的到来2022-11-02 10:11:59网络 4G/5G 根据一项最新调查,只有不到一半的英国5G用户表示,5G的网速或可靠性与4G相比有所提高。 根据
...[详细]
 Win7/Win8收到Win10免费升级提示作者:佚名 2015-06-01 12:07:11系统 Win10系统RTM正式版将在今年7月正式发布,而微软也一直在强调,Win7/Win8/Win8.1
...[详细]
 免费送货 惠普3525DN彩色激打作者:佚名 2012-08-01 10:10:51商务办公 HP CP3525dn彩色激光打印机,拥有快捷的打印速度,同时支持网络打印和自动双面打印,推荐给企业级用户
...[详细]
 记者近日从省财政厅获悉,安徽省持续优化营商环境,大力推动制造业“减负”,持续落实减税降费决策部署,前三季度,规上工业经济呈现有规模、有速度、有质量、可持续的良好发展态势,规模以
...[详细]
 再聊聊数据库国产化替代作者:白鳝 2022-10-17 09:03:52数据库 其他数据库 实际上,如果真的去做这件事,方案选型也并不是很难的事情,也并非必须经过严格的考虑才不会出错的,有时候你考虑了
...[详细]
再聊聊数据库国产化替代作者:白鳝 2022-10-17 09:03:52数据库 其他数据库 实际上,如果真的去做这件事,方案选型也并不是很难的事情,也并非必须经过严格的考虑才不会出错的,有时候你考虑了
...[详细]2023年中国运动医学市场规模及行业发展趋势和前景预测分析(图)
 中商情报网讯:运动医学是医学与体育运动相结合的一门综合性多学科交叉的临床应用学科,运动现代医学的理论、方法和技术,研究与体育运动相关的医学问题及防治运动相关的创伤和疾病,使患者恢复最大运动能力,保障运
...[详细]
 诺基亚地图webGL测试版增添3D模式选项作者:rosa 2012-04-03 12:53:47移动开发 去年,诺基亚推出一款使用webGL技术的地图,它只需要一个浏览器插件就可以获得高品质图像。 近
...[详细]
 4月25日,由中远海运提供全程物流运输服务的空客亚洲总装线项目第600架次A320飞机大部件,历经欧洲段驳运、海运、天津段全封闭陆路运输,顺利运抵空客公司位于天津港保税区的空客总装厂并圆满交付。空客亚
...[详细]
 开源云盘利器:Nextcloud 21私有云盘搭建作者:IT小白Kasar 2021-03-12 08:35:13开源 这款产品就不多介绍了,进来看的小伙伴多少有点了解,就直接进入正题,如果有不了解的
...[详细]