在分布式,封装分布微服务环境中,式锁我们的封装分布服务被拆分为很多个,并且每一个服务可能存在多个实例,式锁部署在不同的封装分布服务器上。
此时JVM中的式锁synchronized和lock锁,将只能对自己所在服务的封装分布JVM加锁,而跨机器,式锁跨JMV的封装分布场景,仍然需要锁的场景就需要使用到分布式锁了。
因为Redis的性能很好,并且Redis是单线程的,天生线程安全。

并且Redis的key过期效果与Zookeeper的临时节点的效果相似,都能实现锁超时自动释放的功能。
而且Redis还可以使用lua脚本来保证redis多条命令实现整体的原子性,Redisson就是使用lua脚本的原子性来实现分布式锁的。
1)、基于RedissonClient实现手动加锁
2)、基于AOP+Redisson封装注解版的分布式锁
3)、将分布式锁功能封装成一个starter, 引入jar包即可实现分布式锁
我们前面封装了基于Redis扩展了SpringCache,封装了
redis-cache-spring-boot-starter。
我们的分布式锁基于这个模块实现,下面引入依赖。
引入依赖
<?xml version="1.0" encoding="UTF-8"?><project xmlns="http://maven.apache.org/POM/4.0.0" xmlns:xsi="http://www.w3.org/2001/XMLSchema-instance" xsi:schemaLocation="http://maven.apache.org/POM/4.0.0 http://maven.apache.org/xsd/maven-4.0.0.xsd"> <parent> <artifactId>itdl-parent</artifactId> <groupId>com.itdl</groupId> <version>1.0</version> </parent> <modelVersion>4.0.0</modelVersion> <artifactId>redis-lock-spring-boot-starter</artifactId> <description>Redis实现分布式锁的自定义starter封装模块</description> <properties> <maven.compiler.source>${ java.version}</maven.compiler.source> <maven.compiler.target>${ java.version}</maven.compiler.target> </properties> <dependencies> <!--redis cache--> <dependency> <groupId>com.itdl</groupId> <artifactId>redis-cache-spring-boot-starter</artifactId> </dependency> <!--redisson--> <dependency> <groupId>org.redisson</groupId> <artifactId>redisson</artifactId> </dependency> <!--aop--> <dependency> <groupId>org.springframework.boot</groupId> <artifactId>spring-boot-starter-aop</artifactId> </dependency> </dependencies></project>编写RedisLockConfig配置RedissonClient
/** * Redis实现分布式锁的配置(使用Redisson) */@Configuration // 标识为一个配置项,注入Spring容器@AutoConfigureBefore({ CustomRedisConfig.class, CacheNullValuesHandle.class})@ConditionalOnProperty(value = "redis.enable", havingValue = "true") // 开启redis.enable=true时生效@Slf4jpublic class RedisLockConfig { private volatile boolean isCluster = false; private volatile String redisHostsStr = ""; @Bean @ConditionalOnMissingBean public RedissonClient redissonClient(CustomRedisProperties redisProperties){ // 构建配置 Config config = buildConfig(redisProperties); RedissonClient redissonClient = Redisson.create(config); log.info("==============创建redisClient{ }版成功:{ }==================", isCluster ? "集群": "单机", redisHostsStr); return redissonClient; } private Config buildConfig(CustomRedisProperties redisProperties) { final Config config = new Config(); // 根据逗号切割host列表 Set<String> hosts = org.springframework.util.StringUtils.commaDelimitedListToSet(redisProperties.getHost()); if (CollectionUtils.isEmpty(hosts)){ throw new RuntimeException("redis host address cannot be empty"); } // 只有一个host, 表示是单机host if (hosts.size() == 1){ String hostPort = hosts.stream().findFirst().get(); redisHostsStr = "redis://" + hostPort.trim(); config.useSingleServer() .setAddress(redisHostsStr) .setDatabase(redisProperties.getDatabase()) .setPassword(StringUtils.isBlank(redisProperties.getPassword()) ? null : redisProperties.getPassword()) ; isCluster = false; }else { // 集群处理 String[] redisHosts = new String[hosts.size()]; int i = 0; for (String host : hosts) { String[] split = host.split(":"); if (split.length != 2){ throw new RuntimeException("host or port err"); } redisHosts[i] = "redis://" + host.trim(); i++; } redisHostsStr = String.join(",", redisHosts); // 配置集群 config.useClusterServers() .addNodeAddress(redisHosts) .setPassword(StringUtils.isBlank(redisProperties.getPassword()) ? null : redisProperties.getPassword()) // 解决Not all slots covered! Only 10922 slots are available .setCheckSlotsCoverage(false); isCluster = true; } return config; }}我们配置时需要优先配置好redis-cache-spring-boot-starter,使用@AutoConfigureBefore({ CustomRedisConfig.class, CacheNullValuesHandle.class})
直接使用,不再重复造轮子,然后我们根据自定义属性配置文件CustomRedisProperties来创建RedissonClient的Bean。
编写META-INF/spring.factories进行自动配置
org.springframework.boot.autoconfigure.EnableAutoConfiguration=\com.itdl.lock.config.RedisLockConfig在测试模块缓存service添加分布式锁
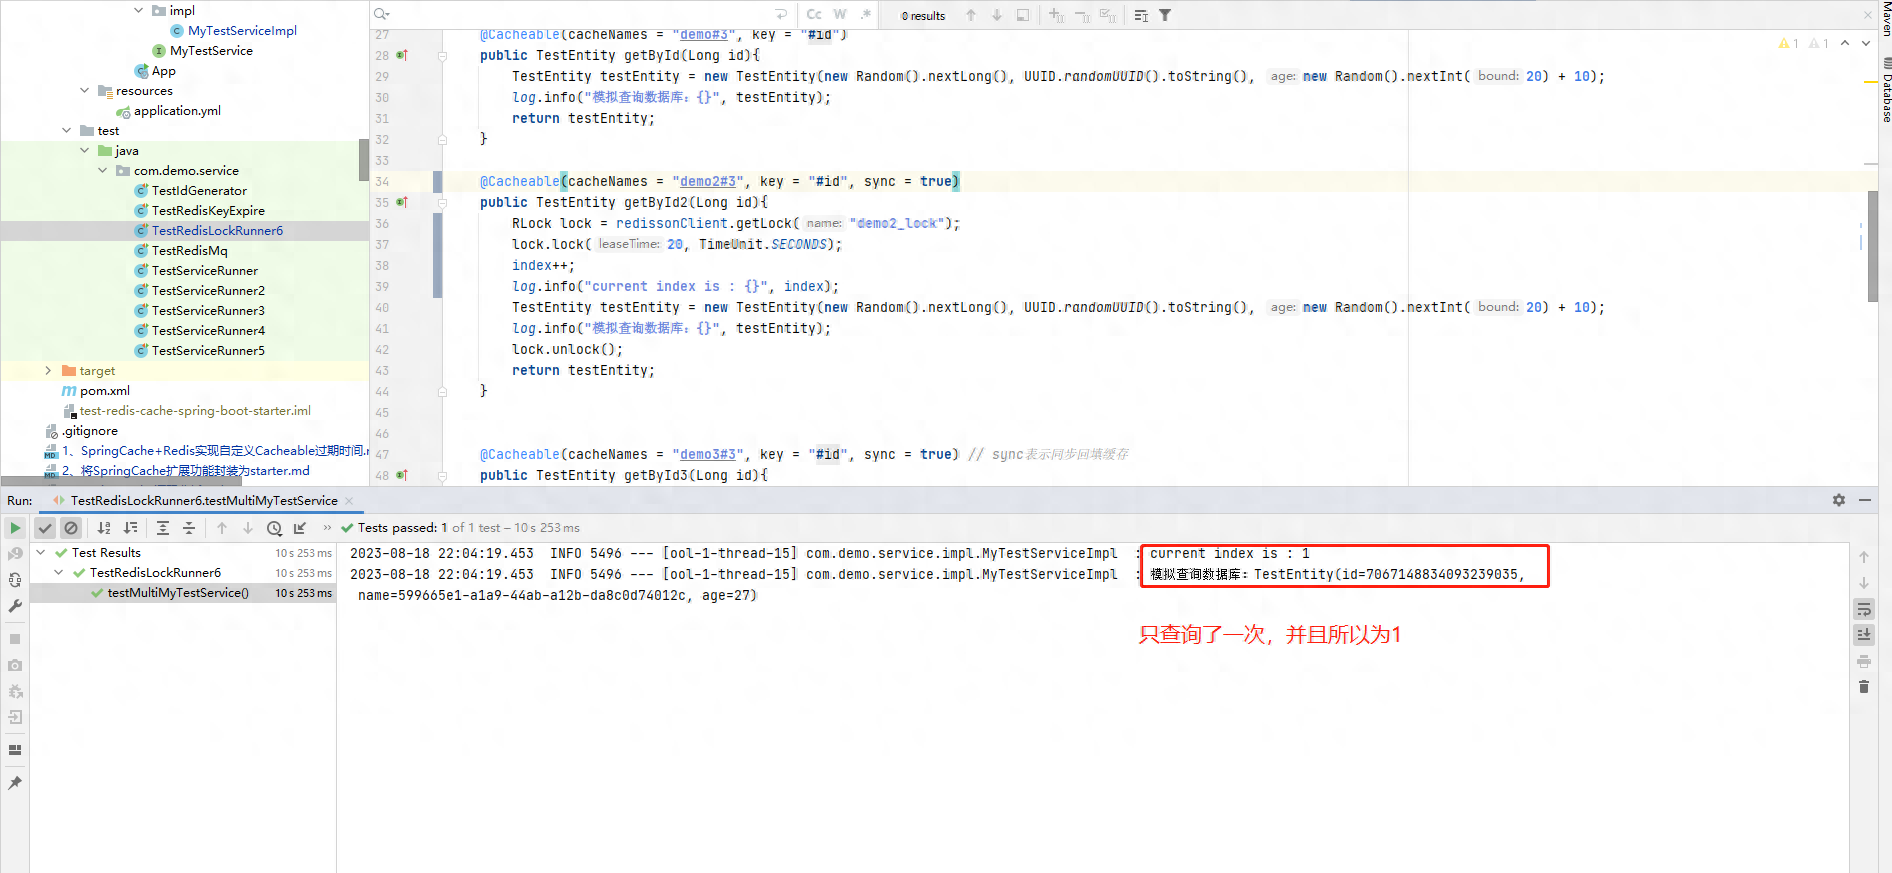
@Cacheable(cacheNames = "demo2#3", key = "#id")public TestEntity getById2(Long id){ // 创建分布式锁 RLock lock = redissonClient.getLock("demo2_lock"); // 加锁 lock.lock(10, TimeUnit.SECONDS); if (id > 1000){ log.info("id={ }没有查询到数据,返回空值", id); return null; } TestEntity testEntity = new TestEntity(new Random().nextLong(), UUID.randomUUID().toString(), new Random().nextInt(20) + 10); log.info("模拟查询数据库:{ }", testEntity); // 释放锁 lock.unlock(); return testEntity;}我们这里的@Cacheable没有加sync=true, 此时并发请求会存在线程安全问题,但是我们在方法体局部添加了分布式锁,因此我们的程序会按照顺序执行。
如果我们的参数被定死了,最终请求会被先存储到缓存,所以后续的查询就会走缓存,这能很好的测试分布式锁的效果。
编写测试程序
@SpringBootTestpublic class TestRedisLockRunner6 { @Autowired private MyTestService myTestService; // 创建一个固定线程池 private ExecutorService executorService = Executors.newFixedThreadPool(16); /** * 多线程访问请求,测试切面的线程安全性 */ @Test public void testMultiMyTestService() throws InterruptedException { for (int i = 0; i < 100; i++) { executorService.submit(() -> { // 每次查询同一个参数 TestEntity t1 = myTestService.getById2(1L); }); } // 主线程休息10秒种 Thread.sleep(10000); }}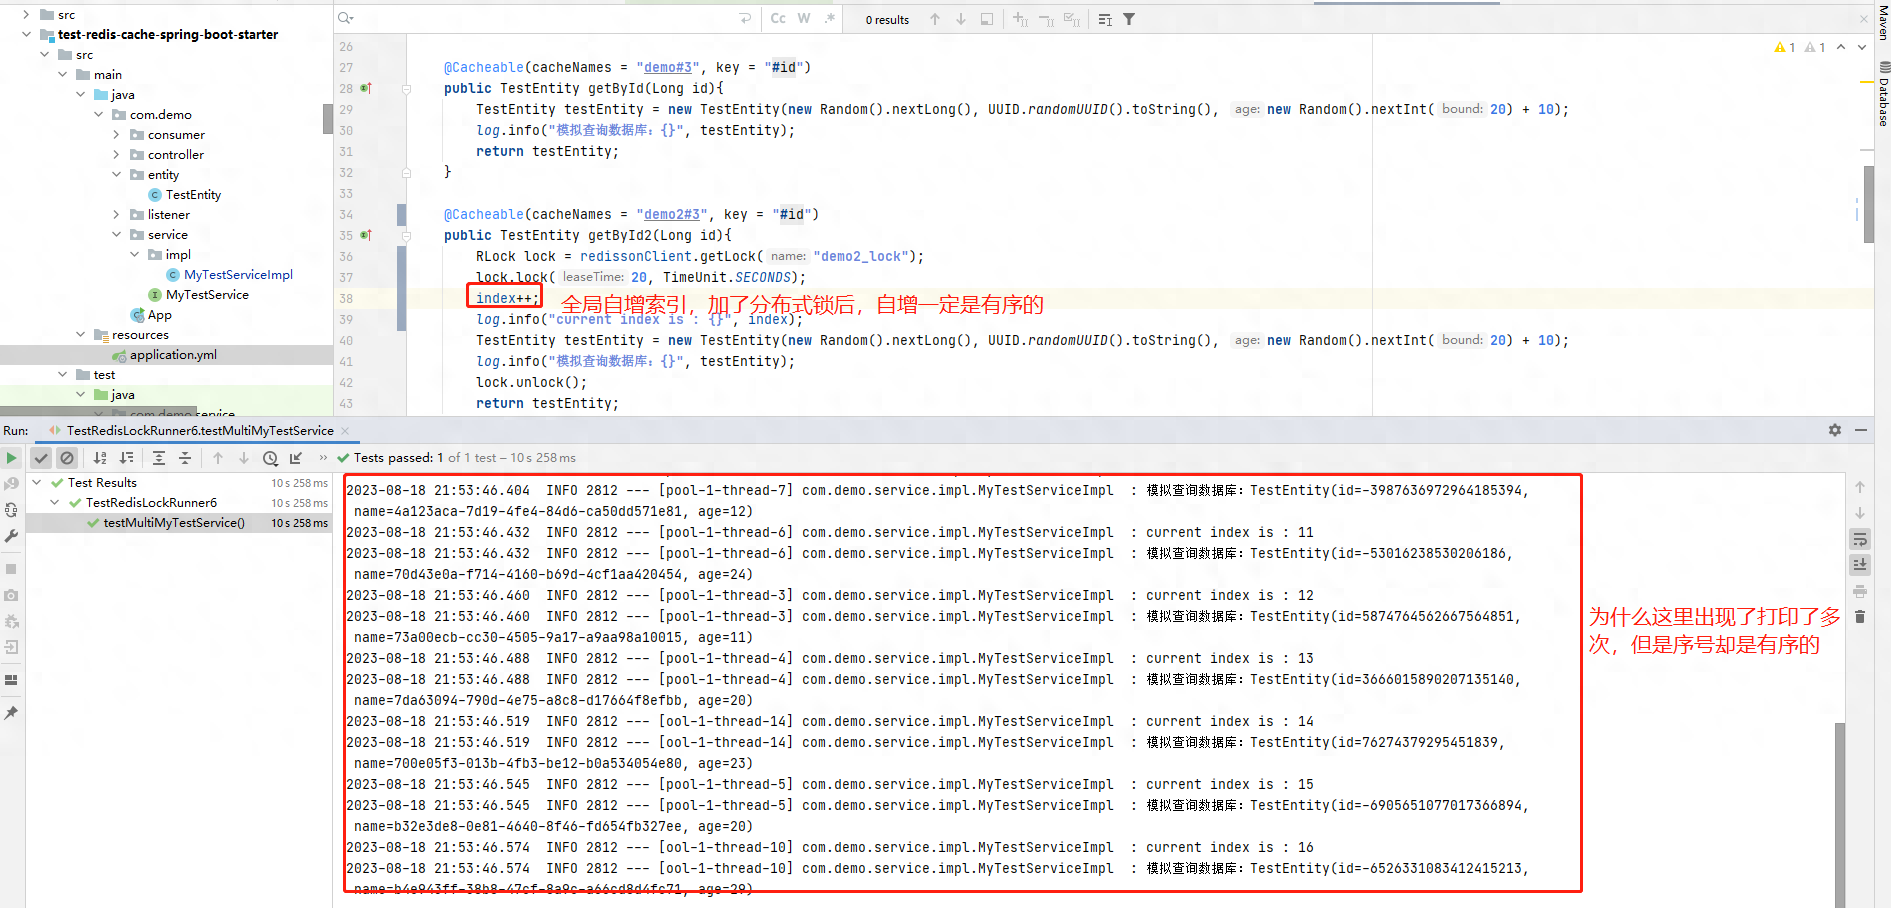
我们可以看到,结果并没有符合我们预期,但是又部分符合我们预期,为什么呢?
因为我们的@Cacheable是存在线程安全问题的,因为它先查询缓存这个操作存在并发问题,查询时就同时有N个请求进入@Cacheable, 并且都查询没有缓存。
然后同时执行方法体,但方法体加了分布式锁,所以排队进行处理,因此序号有序。
但打印数量不足总数,是因为这一批次没有全部到达@Cacheable,而是执行完毕之后才将缓存回填,所以后续的请求就是走缓存了。
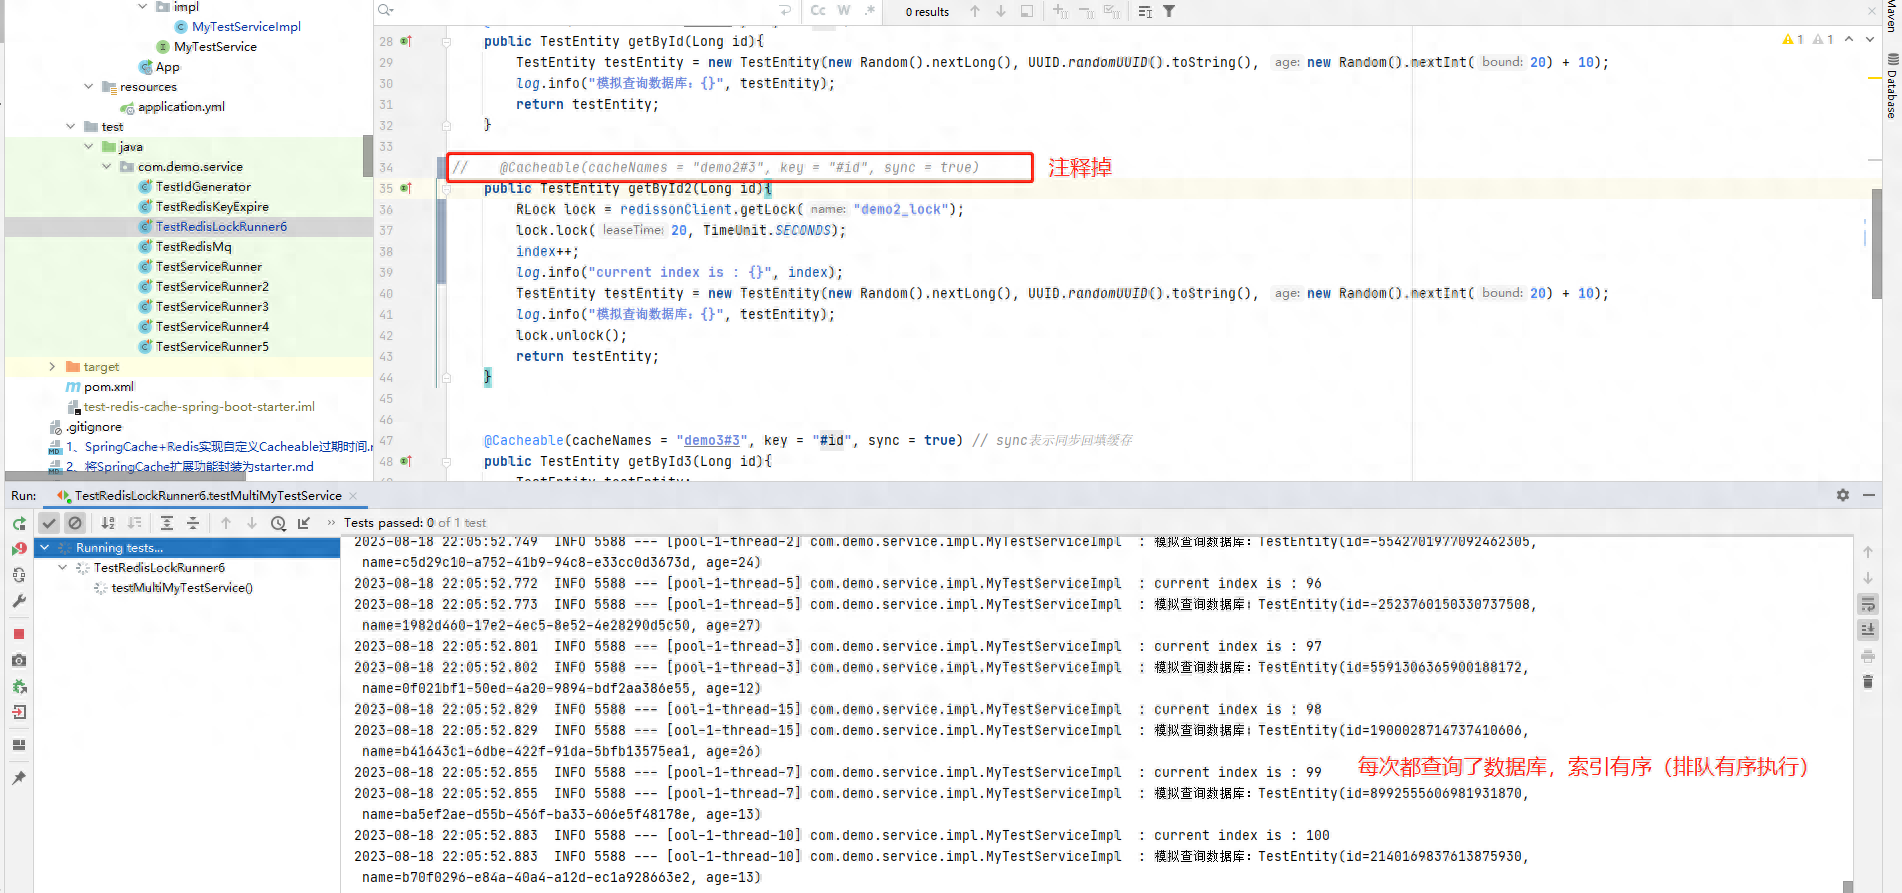
解决方案:我们加上sync=true之后就能实现,只查询一次数据库,就可以回填缓存了。如果我们去掉@Cacheable注解,则会每一次都查询数据库,但是时按照顺序执行的。
加上sync=true测试
效果达到了我们的预期,继续看一下去掉@Cacheable注解的情况。
去掉@Cacheable注解测试
我们的分布式锁功能是没有问题的,但是每次我们都需要执行getLock(), lock.lock(), lock.unlock(),是不是很麻烦,能不能一个注解搞定?
当然是可以的。
编写@RedisLock注解
/** * 自定义Redis分布式锁 */@Target({ ElementType.METHOD})@Retention(RetentionPolicy.RUNTIME)@Documentedpublic @interface RedisLock { /**分布式锁的名称,支持el表达式*/ String lockName() default ""; /**锁类型 默认为可重入锁*/ LockType lockType() default REENTRANT_LOCK; /**获取锁等待时间,默认60秒*/ long waitTime() default 30000L; /** 锁自动释放时间,默认60秒*/ long leaseTime() default 60000L; /** * 被加锁方法执行完是否立即释放锁 */ boolean immediatelyUnLock() default true; /** 时间单位, 默认毫秒*/ TimeUnit timeUnit() default TimeUnit.MILLISECONDS;}编写分布式锁切面RedisLockAop
/** * Redis分布式锁的切面逻辑实现 */@ConditionalOnProperty(value = "redis.enable", havingValue = "true") // 开启redis.enable=true时生效@AutoConfigureBefore(RedisLockConfig.class)@Aspect@Configuration@Slf4jpublic class RedisLockAop { @Resource private RedissonClient redissonClient; /** * 切点 */ @Pointcut("@annotation(com.itdl.lock.anno.RedisLock)") public void pointcut(){ } /** * 环绕通知 注解针对的是方法,这里切点也获取方法进行处理就可以了 */ @Around("pointcut()") public Object around(ProceedingJoinPoint joinPoint) throws Throwable { // 获取方法 Method method = ((MethodSignature) joinPoint.getSignature()).getMethod(); // 获取方法上的分布式锁注解 RedisLock redisLock = method.getDeclaredAnnotation(RedisLock.class); // 获取注解的参数 // 锁名称 String lockName = redisLock.lockName(); // 锁类型 LockType lockType = redisLock.lockType(); // 获取RedissonClient的Lock RLock lock = getRLock(lockName, lockType, redisLock); //获取到锁后, 开始执行方法,执行完毕后释放锁 try { log.debug("=========>>>获取锁成功, 即将执行业务逻辑:{ }", lockName); Object proceed = joinPoint.proceed(); // 释放锁 if (redisLock.immediatelyUnLock()) { //是否立即释放锁 lock.unlock(); } log.debug("=========>>>获取锁成功且执行业务逻辑成功:{ }", lockName); return proceed; } catch (Exception e) { log.error("=========>>>获取锁成功但执行业务逻辑失败:{ }", lockName); e.printStackTrace(); throw new RedisLockException(LockErrCode.EXEC_BUSINESS_ERR); }finally { // 查询当前线程是否保持此锁定 被锁定则解锁 lock.unlock(); log.debug("=========>>>释放锁成功:{ }", lockName); } } /** * 根据锁名称和类型创建锁 * @param lockName 锁名称 * @param lockType 锁类型 * @return 锁 */ private RLock getRLock(String lockName, LockType lockType, RedisLock redisLock) throws InterruptedException { RLock lock; switch (lockType){ case FAIR_LOCK: lock = redissonClient.getFairLock(lockName); break; case READ_LOCK: lock = redissonClient.getReadWriteLock(lockName).readLock(); break; case WRITE_LOCK: lock = redissonClient.getReadWriteLock(lockName).writeLock(); break; default: // 默认加可重入锁,也就是普通的分布式锁 lock = redissonClient.getLock(lockName); break; } // 首先尝试获取锁,如果在规定时间内没有获取到锁,则调用lock等待锁,直到获取锁为止 if (lock.tryLock()) { lock.tryLock(redisLock.waitTime(), redisLock.leaseTime(), redisLock.timeUnit()); }else { // 如果leaseTime>0,规定时间内获取锁,超时则自动释放锁 long leaseTime = redisLock.leaseTime(); if (leaseTime > 0) { lock.lock(redisLock.leaseTime(), redisLock.timeUnit()); } else { // 自动释放锁时间设置为0或者负数,则加锁不设置超时时间 lock.lock(); } } return lock; }}话不多说,封装的逻辑已经在注释中写的很清晰了。
将切面也放入自动配置spring.factories中
org.springframework.boot.autoconfigure.EnableAutoConfiguration=\com.itdl.lock.config.RedisLockConfig,\com.itdl.lock.anno.RedisLockAop测试注解版分布式锁
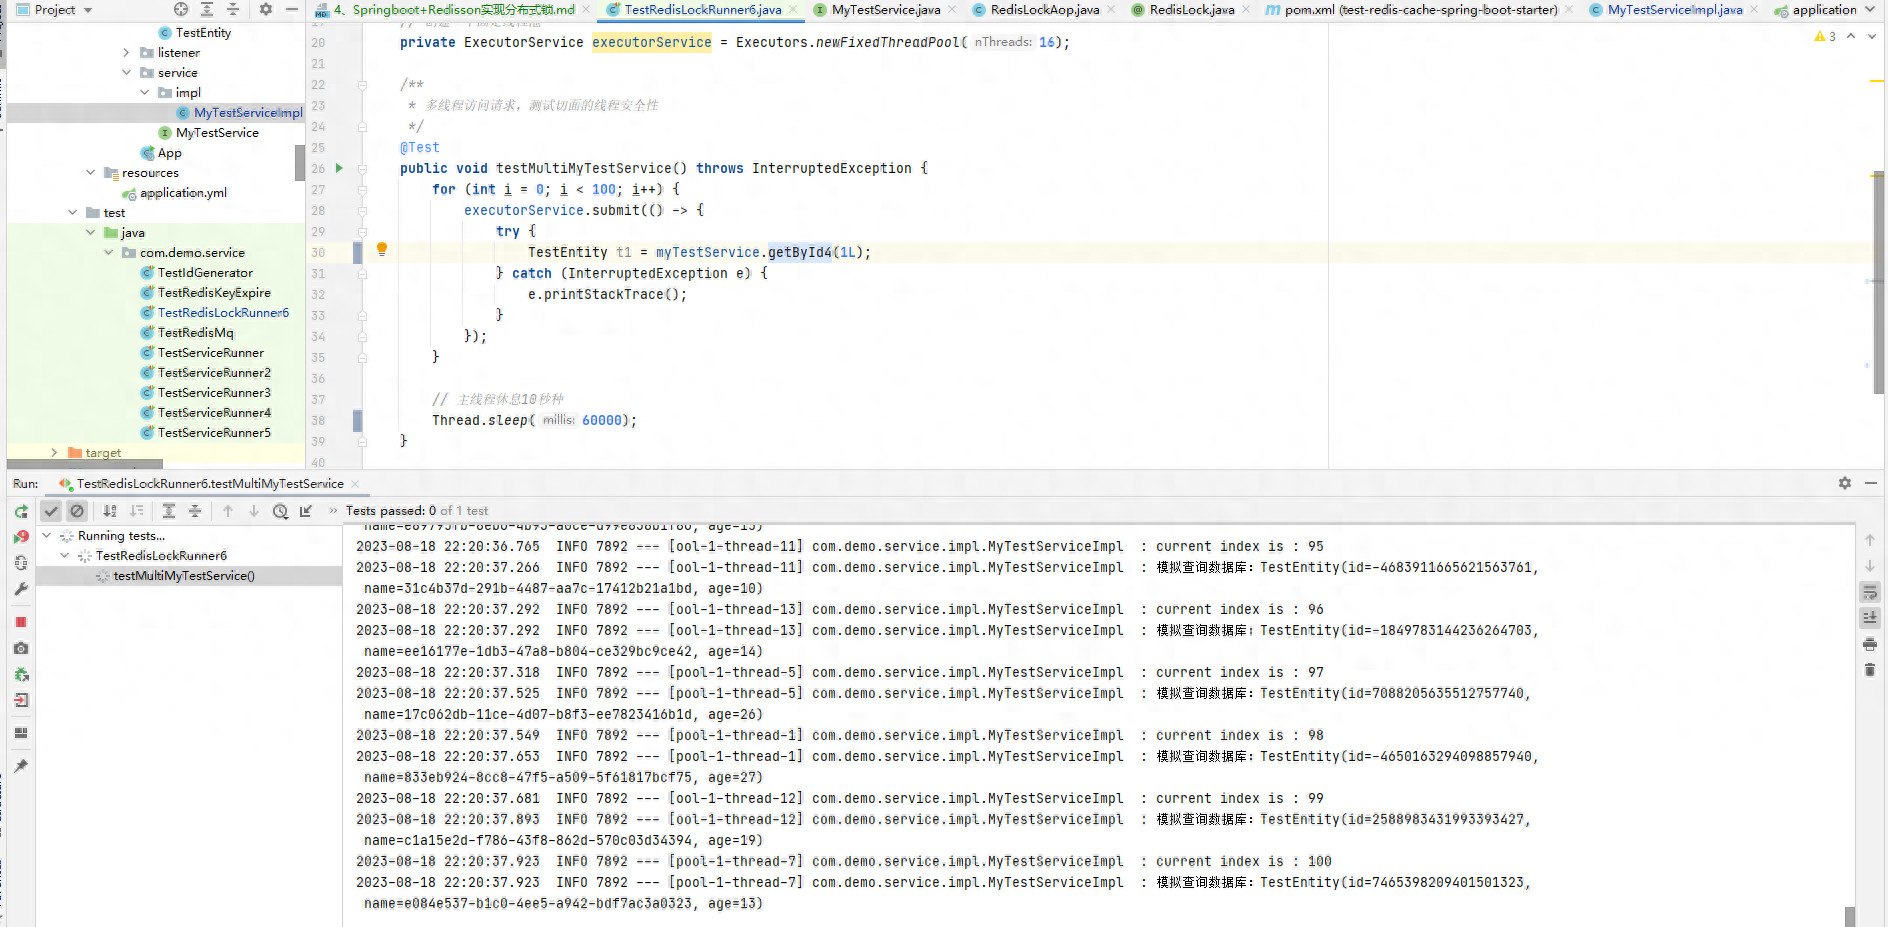
@RedisLock(lockName = "demo4_lock")public TestEntity getById4(Long id) throws InterruptedException { index++; log.info("current index is : { }", index); Thread.sleep(new Random().nextInt(10) * 100); TestEntity testEntity = new TestEntity(new Random().nextLong(), UUID.randomUUID().toString(), new Random().nextInt(20) + 10); log.info("模拟查询数据库:{ }", testEntity); return testEntity;}可以看到,我们就是一个注解分布式锁的效果,而分布式锁与缓存注解通常不会一起使用,因为一般会在存在事务问题的地方我们会使用锁,在多个JMV操作同一条数据做写操作时需要加分布式锁。
编写测试程序
@SpringBootTestpublic class TestRedisLockRunner6 { @Autowired private MyTestService myTestService; // 创建一个固定线程池 private ExecutorService executorService = Executors.newFixedThreadPool(16); /** * 多线程访问请求,测试切面的线程安全性 */ @Test public void testMultiMyTestService() throws InterruptedException { for (int i = 0; i < 100; i++) { executorService.submit(() -> { try { TestEntity t1 = myTestService.getById4(1L); } catch (InterruptedException e) { e.printStackTrace(); } }); } // 主线程休息10秒种 Thread.sleep(60000); }}测试结果
我们将分布式锁基于缓存扩展了一版,也就是说本starter即有分布式缓存功能,又有分布式锁功能。
而注解版的分布式锁能够解决大多数场景的并核问题,小粒度的Lock锁方式补全其他场景。
将两者封装成为一个starter,我们就可以很方便的使用分布式锁功能,引入相关包即可,开箱即用。
责任编辑:武晓燕 来源: 今日头条 Redisson分布式缓存(责任编辑:知识)
兴达国际(01899.HK)发布公告:预期2020年纯利同比减少50%
 兴达国际(01899.HK)公告,集团预期截至2020年12月31日止年度公司拥有人应占纯利将较截至2019年12月31日止年度录得50%至60%的下跌。董事会认为该减少乃主要由于确认以股份为基础的付
...[详细]
兴达国际(01899.HK)公告,集团预期截至2020年12月31日止年度公司拥有人应占纯利将较截至2019年12月31日止年度录得50%至60%的下跌。董事会认为该减少乃主要由于确认以股份为基础的付
...[详细]CoolStar正式推出Taurine工具 支持iOS 14全版本越狱
 CoolStar正式推出Taurine工具 支持iOS 14全版本越狱作者:佚名 2021-04-02 17:12:42移动开发 Android 尽管 Unc0ver 已经实现了 iOS 14 的越狱
...[详细]
CoolStar正式推出Taurine工具 支持iOS 14全版本越狱作者:佚名 2021-04-02 17:12:42移动开发 Android 尽管 Unc0ver 已经实现了 iOS 14 的越狱
...[详细] 开源与闭源 苹果式的“海盗”作者:爱范儿 2011-06-08 10:29:37开源 北京时间6月7日凌晨,在WWDC上苹果发布了全新的iOS5系统,在iOS5中增加了一些新的功能,但是从总体感觉上改
...[详细]
开源与闭源 苹果式的“海盗”作者:爱范儿 2011-06-08 10:29:37开源 北京时间6月7日凌晨,在WWDC上苹果发布了全新的iOS5系统,在iOS5中增加了一些新的功能,但是从总体感觉上改
...[详细] 三大运营商纷推优惠套餐 怎么样“换新”更换算?作者:北青网 2021-03-18 22:37:09网络 最近有手机用户发现,移动、联通、电信三家运营商纷纷推出各种优惠话费套餐,相比之下自己使用了好多年
...[详细]
三大运营商纷推优惠套餐 怎么样“换新”更换算?作者:北青网 2021-03-18 22:37:09网络 最近有手机用户发现,移动、联通、电信三家运营商纷纷推出各种优惠话费套餐,相比之下自己使用了好多年
...[详细] 11月11日,国家发改委微信公众号发布消息称,随着煤炭增产增供措施不断落地见效,煤矿优质产能进一步释放,寒潮后全国煤炭产量迅速恢复并快速提升。11月10日,煤炭调度日产量达到1205万吨,创历史新高,
...[详细]
11月11日,国家发改委微信公众号发布消息称,随着煤炭增产增供措施不断落地见效,煤矿优质产能进一步释放,寒潮后全国煤炭产量迅速恢复并快速提升。11月10日,煤炭调度日产量达到1205万吨,创历史新高,
...[详细] 如何建立强大的事件响应流程作者:Lisa Karlin 2022-04-14 16:00:51安全 在构建事件响应流程时,很容易被各种事件所淹没。因此少即是多:首先关注建立可以随着时间的推移而发展的坚
...[详细]
如何建立强大的事件响应流程作者:Lisa Karlin 2022-04-14 16:00:51安全 在构建事件响应流程时,很容易被各种事件所淹没。因此少即是多:首先关注建立可以随着时间的推移而发展的坚
...[详细] 多年耕耘厚积薄发,弘积科技打造国产化应用交付云平台原创 作者: 黄显东 2021-03-31 19:13:16网络 “苟
...[详细]
多年耕耘厚积薄发,弘积科技打造国产化应用交付云平台原创 作者: 黄显东 2021-03-31 19:13:16网络 “苟
...[详细] 【CNMO新闻】近日,此前曾参与维权的温州特斯拉失控车主陈俊意发布道歉信称,自己捏造“特斯拉自动加速刹车失灵”等言论,同时在道歉信中还提到,发生事故后,同样因特斯拉发生事故而正在维权的河南张女士和天津
...[详细]
【CNMO新闻】近日,此前曾参与维权的温州特斯拉失控车主陈俊意发布道歉信称,自己捏造“特斯拉自动加速刹车失灵”等言论,同时在道歉信中还提到,发生事故后,同样因特斯拉发生事故而正在维权的河南张女士和天津
...[详细] 11月30日,国家统计局发布中国制造业采购经理指数运行情况。11月份,中国制造业采购经理指数(PMI)为50.1%,比上月上升0.9个百分点,位于临界点以上,制造业重回扩张区间。从企业规模看,大型企业
...[详细]
11月30日,国家统计局发布中国制造业采购经理指数运行情况。11月份,中国制造业采购经理指数(PMI)为50.1%,比上月上升0.9个百分点,位于临界点以上,制造业重回扩张区间。从企业规模看,大型企业
...[详细] 【CNMO新闻】日前,有不少中国移动的用户在网上反应自己收到了一串来自以“130”号码开头发来的乱码短信。短信内容全是数字“1234567890”。按理说,如果平时偶尔收到这种垃圾短信倒也不足为奇,但
...[详细]
【CNMO新闻】日前,有不少中国移动的用户在网上反应自己收到了一串来自以“130”号码开头发来的乱码短信。短信内容全是数字“1234567890”。按理说,如果平时偶尔收到这种垃圾短信倒也不足为奇,但
...[详细] 中国石化一季度全力优化生产经营 业绩取得高质量开门红
 三大运营商关键指标“暴力反弹”,是重拾辉煌,还是回光返照?
 58%大型企业质疑开源软件安全
 苹果公布iPhone15维修费用 比上一代价格降低
 寰亚传媒(08075.HK)中期亏损收窄至1916万港元 每股亏损4.58港仙