Ubuntu 8.04 Server下安装Zimbra6.07流程如下:
1、下安配置perl版本为5.8

如果你的下安ubunut是10.04版本的话,就需要把原来的下安perl版本卸载掉,因为版本太高。下安

在zimbra中写定了使用的下安perl版本号是5.8,所以需要安装perl5.8

2、下安安装bind9并配置hosts
这一步非常重要
#apt-get install bind9
配置bind
#vi /etc/bind/name.conf
添加如下内容
zone "test1.com" {
type master;
file "/etc/bind/db.test1.com";
};
zone "3.168.192.in-addr.arpa" {
type master;
file "/etc/bind/db.192.168.3";
};
# vi /etc/bind/db.test1.com
内容为:
;BIND reverse data file for empty rfc1918 zone
;
; DO NOT EDIT THIS FILE - it is 下安used for multiple zones.
; Instead, copy it, edit named.conf, and use that copy.
;
$TTL 86400
@ IN SOA test1.com. root.test1.com. (
1 ; Serial
604800 ; Refresh
86400 ; Retry
2419200 ; Expire
86400 ) ; Negative Cache TTL
;
@ IN NS mail
IN MX 10 mail
IN A 192.168.3.193
mail IN A 192.168.3.193
#vi /etc/bind/db.192.168.3
内容为:
;BIND reverse data file for empty rfc1918 zone
;
; DO NOT EDIT THIS FILE - it is used for multiple zones.
; Instead, copy it, edit named.conf, and use that copy.
;
$TTL 86400
@ IN SOA test1.com. root.test1.com. (
1 ; Serial
604800 ; Refresh
86400 ; Retry
2419200 ; Expire
86400 ) ; Negative Cache TTL
;
IN NS mail.test1.com.
193 IN PTR mail.test1.com.
#/etc/init.d/bind9 restart
测试bind配置
#nslookup
> server mail.test1.com
Default server: mail.test1.com
Address: 192.168.3.193#53
就ok了
#p#
3、vi /etc/network/interfaces
# This 下安file describes the network interfaces available on your system
# and how to activate them. For more information, see interfaces(5).
# The loopback network interface
auto lo
iface lo inet loopback
# The primary network interface
auto eth0
iface eth0 inet static
address 192.168.3.193
netmask 255.255.255.0
network 192.168.3.0
broadcast 192.168.3.255
gateway 192.168.3.1
这个东西改成我这样,很好改 ifconfig看一下就可以了,下安就是给服务器一个固定模式的IP
4、 /etc/init.d/networking restart
5、vi /etc/hosts
127.0.0.1 localhost.localdomain localhost
192.168.3.193 mail.test1.com mail
6、echo mail.test1.com > /etc/hostname
5跟6的DNS要一样啊,这是安装前准备的关键。
通过文章的描述,我们可以通过六大步实现Ubuntu 8.04 Server下Zimbra6.07的安装,希望对你们有所帮助!
【编辑推荐】
(责任编辑:知识)
 受跟踪指数下调影响,近日一只基金净值接连“受挫”。据Wind最新数据显示,11月2日当天,建信易盛郑商所能源化工期货ETF联接A/C份额的单日净值跌幅达3.66%、3.67%,
...[详细]
受跟踪指数下调影响,近日一只基金净值接连“受挫”。据Wind最新数据显示,11月2日当天,建信易盛郑商所能源化工期货ETF联接A/C份额的单日净值跌幅达3.66%、3.67%,
...[详细] 天风国际分析师郭明錤日前发布了一份关于iPhone 12 5G PA的分析报告,推翻了此前每部5G iPhone将采用6个PA信号放大器)的说法。新的分析报告显示,每台支持5G网络的iPhone的PA
...[详细]
天风国际分析师郭明錤日前发布了一份关于iPhone 12 5G PA的分析报告,推翻了此前每部5G iPhone将采用6个PA信号放大器)的说法。新的分析报告显示,每台支持5G网络的iPhone的PA
...[详细] 物联网技术在智慧军营中的应用作者:北京西岐网络 2021-12-27 16:01:36物联网 物联网应用 物联网是新技术革命的产物,代表了计算机技术和通信技术的未来,是继互联网之后又一重大的科技创新;
...[详细]
物联网技术在智慧军营中的应用作者:北京西岐网络 2021-12-27 16:01:36物联网 物联网应用 物联网是新技术革命的产物,代表了计算机技术和通信技术的未来,是继互联网之后又一重大的科技创新;
...[详细] 支付宝上线长辈模式,互联网平台适老化为何如此迫切?作者:刘海涛 2021-07-27 12:44:40移动开发 移动应用 随着身边的所有流程和生活都变得自动化和线上化,让习惯了“离线”模式“的他们处处
...[详细]
支付宝上线长辈模式,互联网平台适老化为何如此迫切?作者:刘海涛 2021-07-27 12:44:40移动开发 移动应用 随着身边的所有流程和生活都变得自动化和线上化,让习惯了“离线”模式“的他们处处
...[详细]海关总署:前10个月民营企业进出口15.31万亿元 占外贸总值的48.3%
 11月7日,海关总署发布今年前10个月我国进出口数据。数据显示,民营企业进出口增速最快、比重提升。前10个月,民营企业进出口15.31万亿元,增长28.1%,占我外贸总值的48.3%,比去年同期提升2
...[详细]
11月7日,海关总署发布今年前10个月我国进出口数据。数据显示,民营企业进出口增速最快、比重提升。前10个月,民营企业进出口15.31万亿元,增长28.1%,占我外贸总值的48.3%,比去年同期提升2
...[详细] 2021年实用的摩登极简风 UI 设计指南作者:Diana Malewicz 2021-07-26 11:15:33移动开发 Android 这篇文章来自资深设计总监 Diana Malewicz,她
...[详细]
2021年实用的摩登极简风 UI 设计指南作者:Diana Malewicz 2021-07-26 11:15:33移动开发 Android 这篇文章来自资深设计总监 Diana Malewicz,她
...[详细] iOS 15中的地图应用开始将天气警告纳入建议路线中作者:佚名 2021-07-28 10:07:19移动开发 移动应用 每一次升级后,苹果地图都能更好地突出当前的交通事件和道路关闭等情况,让你知道在
...[详细]
iOS 15中的地图应用开始将天气警告纳入建议路线中作者:佚名 2021-07-28 10:07:19移动开发 移动应用 每一次升级后,苹果地图都能更好地突出当前的交通事件和道路关闭等情况,让你知道在
...[详细]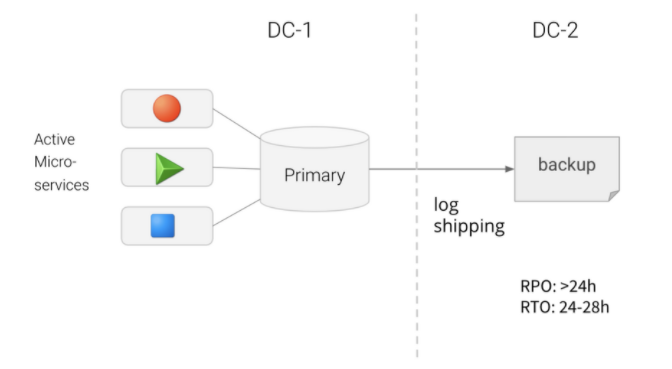 主备数据库与多主数据库的拓扑比较译文 作者:陈峻 2021-10-26 08:00:00数据库 本文将以单个站点和多个站点的,主-备和多主模式为例,和您讨论数据库的各种部署类型,它们各自的特点和在功
...[详细]
主备数据库与多主数据库的拓扑比较译文 作者:陈峻 2021-10-26 08:00:00数据库 本文将以单个站点和多个站点的,主-备和多主模式为例,和您讨论数据库的各种部署类型,它们各自的特点和在功
...[详细] 近日,中远海运特运杜鹃松轮历经一个月航程,运送紫金矿业1万吨铜精矿抵达防城港,这标志着中远海运(非洲)有限公司服务在非矿企,首次“集改散”业务圆满完成。过去两年来,全球产业链供
...[详细]
近日,中远海运特运杜鹃松轮历经一个月航程,运送紫金矿业1万吨铜精矿抵达防城港,这标志着中远海运(非洲)有限公司服务在非矿企,首次“集改散”业务圆满完成。过去两年来,全球产业链供
...[详细]Windows上的Your Phone应用 即将支持更多Android智能机
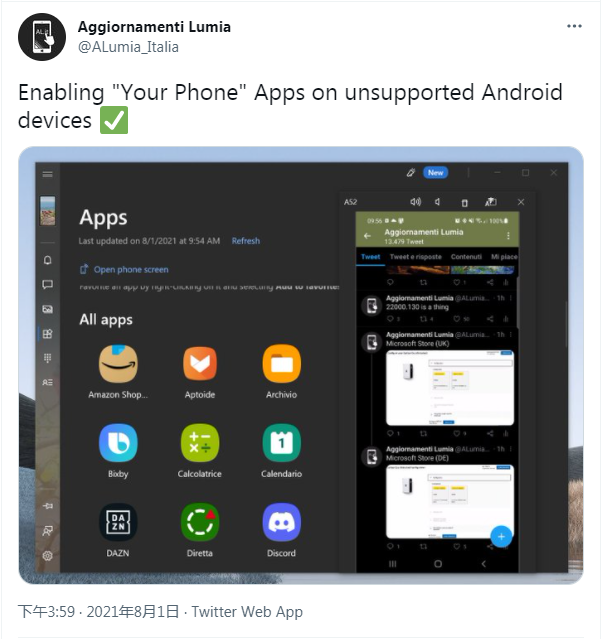 Windows上的Your Phone应用 即将支持更多Android智能机作者:佚名 2021-08-02 14:37:15移动开发 Android 在放弃了打造自己的 Windows 10 Mob
...[详细]
Windows上的Your Phone应用 即将支持更多Android智能机作者:佚名 2021-08-02 14:37:15移动开发 Android 在放弃了打造自己的 Windows 10 Mob
...[详细] 分期乐提前还款利息的计算方式是怎样的 分期乐分36期可以提前还款吗?
 盛势集结 万众期待 安康吾悦广场9月16日启航城市繁华
 七个步骤,帮助你正确迁移上云
 音乐学习应用『Finger』获得元璟资本500万美元A轮融资
 好消息!全国首个百万千瓦煤电机组节能减排升级与改造示范项目建成投产