1.建立一个神经网络添加层
输入值、经网输入的构建大小、输出的学习大小和激励函数
学过神经网络的人看下面这个图就明白了,不懂的经网去看看我的另一篇博客(http://www.cnblogs.com/wjy-lulu/p/6547542.html)
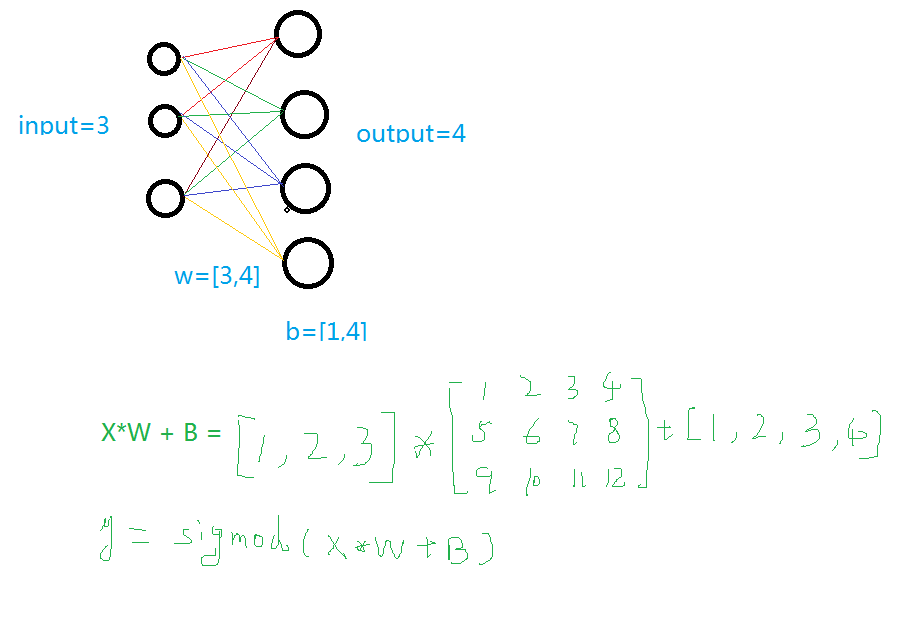
- def add_layer(inputs , in_size , out_size , activate = None):
- Weights = tf.Variable(tf.random_normal([in_size,out_size]))#随机初始化
- baises = tf.Variable(tf.zeros([1,out_size])+0.1)#可以随机但是不要初始化为0,都为固定值比随机好点
- y = tf.matmul(inputs,构建 Weights) + baises #matmul:矩阵乘法,multipy:一般是学习数量的乘法
- if activate:
- y = activate(y)
- return y
2.训练一个二次函数
- import tensorflow as tf
- import numpy as np
- def add_layer(inputs , in_size , out_size , activate = None):
- Weights = tf.Variable(tf.random_normal([in_size,out_size]))#随机初始化
- baises = tf.Variable(tf.zeros([1,out_size])+0.1)#可以随机但是不要初始化为0,都为固定值比随机好点
- y = tf.matmul(inputs,经网 Weights) + baises #matmul:矩阵乘法,multipy:一般是构建数量的乘法
- if activate:
- y = activate(y)
- return y
- if __name__ == '__main__':
- x_data = np.linspace(-1,1,300,dtype=np.float32)[:,np.newaxis]#创建-1,1的300个数,此时为一维矩阵,学习后面转化为二维矩阵===[1,经网2,3]-->>[[1,2,3]]
- noise = np.random.normal(0,0.05,x_data.shape).astype(np.float32)#噪声是(1,300)格式,0-0.05大小
- y_data = np.square(x_data) - 0.5 + noise #带有噪声的抛物线
- xs = tf.placeholder(tf.float32,[None,1]) #外界输入数据
- ys = tf.placeholder(tf.float32,[None,1])
- l1 = add_layer(xs,1,10,activate=tf.nn.relu)
- prediction = add_layer(l1,10,1,activate=None)
- loss = tf.reduce_mean(tf.reduce_sum(tf.square(ys - prediction),reduction_indices=[1]))#误差
- train_step = tf.train.GradientDescentOptimizer(0.1).minimize(loss)#对误差进行梯度优化,步伐为0.1
- sess = tf.Session()
- sess.run( tf.global_variables_initializer())
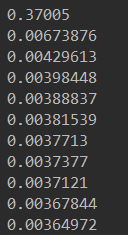
- for i in range(1000):
- sess.run(train_step,构建 feed_dict={ xs: x_data, ys: y_data})#训练
- if i%50 == 0:
- print(sess.run(loss, feed_dict={ xs: x_data, ys: y_data}))#查看误差
3.动态显示训练过程
显示的步骤程序之中部分进行说明,其它说明请看其它博客(http://www.cnblogs.com/wjy-lulu/p/7735987.html)
- import tensorflow as tf
- import numpy as np
- import matplotlib.pyplot as plt
- def add_layer(inputs , in_size , out_size , activate = None):
- Weights = tf.Variable(tf.random_normal([in_size,out_size]))#随机初始化
- baises = tf.Variable(tf.zeros([1,out_size])+0.1)#可以随机但是不要初始化为0,都为固定值比随机好点
- y = tf.matmul(inputs, Weights) + baises #matmul:矩阵乘法,multipy:一般是数量的乘法
- if activate:
- y = activate(y)
- return y
- if __name__ == '__main__':
- x_data = np.linspace(-1,1,300,dtype=np.float32)[:,np.newaxis]#创建-1,1的300个数,此时为一维矩阵,后面转化为二维矩阵===[1,2,3]-->>[[1,2,3]]
- noise = np.random.normal(0,0.05,x_data.shape).astype(np.float32)#噪声是(1,300)格式,0-0.05大小
- y_data = np.square(x_data) - 0.5 + noise #带有噪声的抛物线
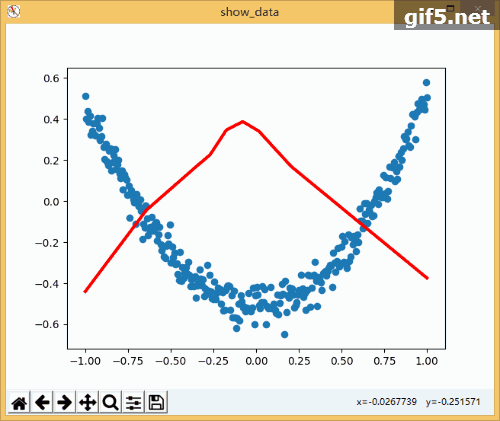
- fig = plt.figure('show_data')# figure("data")指定图表名称
- ax = fig.add_subplot(111)
- ax.scatter(x_data,y_data)
- plt.ion()
- plt.show()
- xs = tf.placeholder(tf.float32,[None,1]) #外界输入数据
- ys = tf.placeholder(tf.float32,[None,1])
- l1 = add_layer(xs,1,10,activate=tf.nn.relu)
- prediction = add_layer(l1,10,1,activate=None)
- loss = tf.reduce_mean(tf.reduce_sum(tf.square(ys - prediction),reduction_indices=[1]))#误差
- train_step = tf.train.GradientDescentOptimizer(0.1).minimize(loss)#对误差进行梯度优化,步伐为0.1
- sess = tf.Session()
- sess.run( tf.global_variables_initializer())
- for i in range(1000):
- sess.run(train_step, feed_dict={ xs: x_data, ys: y_data})#训练
- if i%50 == 0:
- try:
- ax.lines.remove(lines[0])
- except Exception:
- pass
- prediction_value = sess.run(prediction, feed_dict={ xs: x_data})
- lines = ax.plot(x_data,prediction_value,"r",lw = 3)
- print(sess.run(loss, feed_dict={ xs: x_data, ys: y_data}))#查看误差
- plt.pause(2)
- while True:
- plt.pause(0.01)
4.TensorBoard整体结构化显示
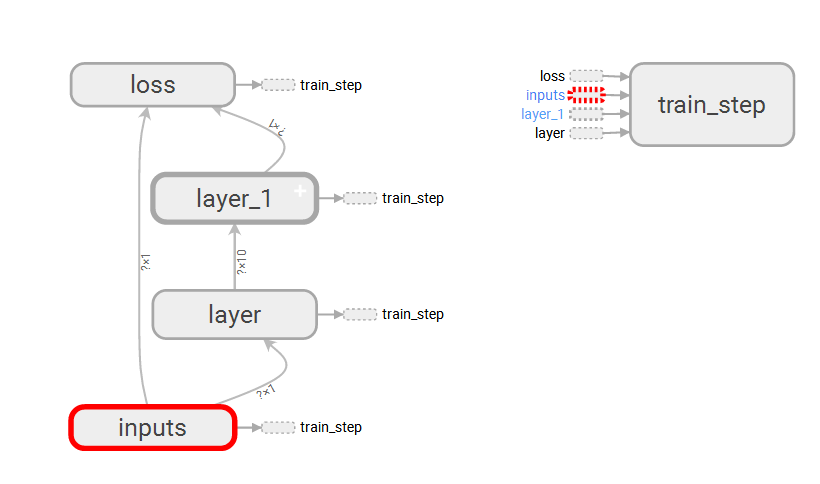
A.利用with tf.name_scope("name")创建大结构、利用函数的name="name"去创建小结构:tf.placeholder(tf.float32,[None,1],name="x_data")
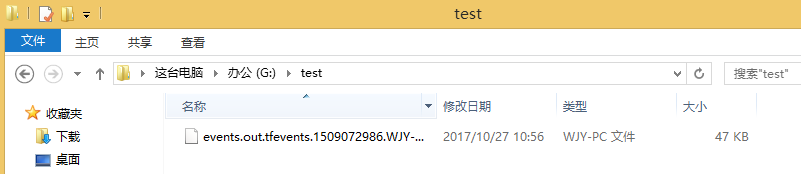
B.利用writer = tf.summary.FileWriter("G:/test/",graph=sess.graph)创建一个graph文件
C.利用TessorBoard去执行这个文件
这里得注意--->>>首先到你存放文件的上一个目录--->>然后再去运行这个文件
tensorboard --logdir=test
(被屏蔽的GIF动图,具体安装操作欢迎戳“原文链接”哈!)
5.TensorBoard局部结构化显示
A. tf.summary.histogram(layer_name+"Weight",Weights):直方图显示
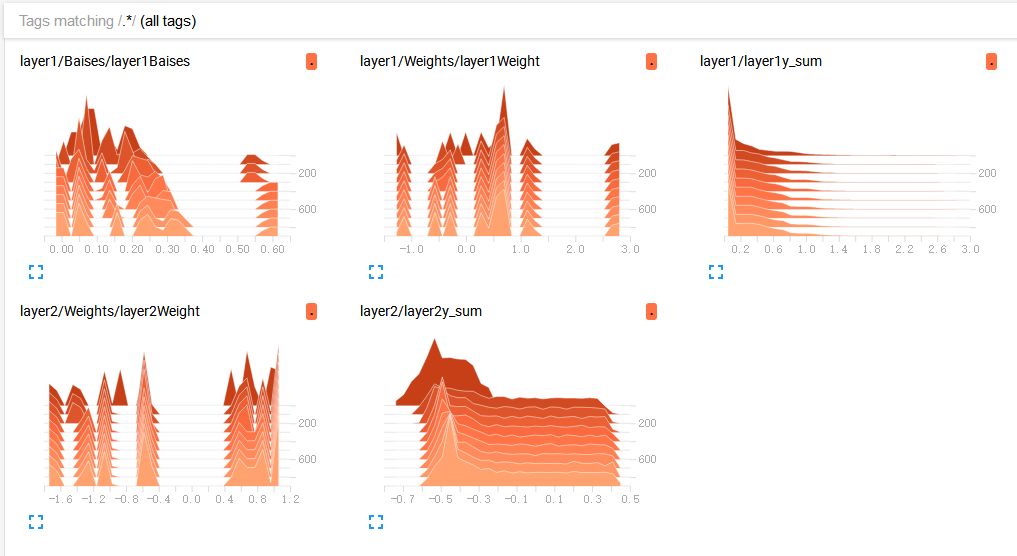
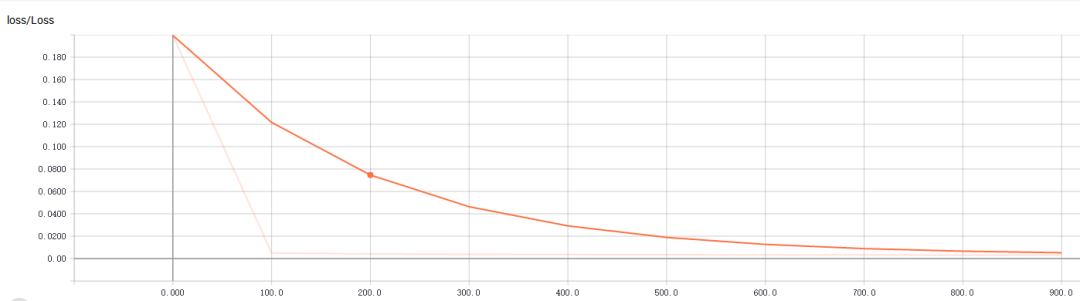
B. tf.summary.scalar("Loss",loss):折线图显示,loss的走向决定你的网络训练的好坏,至关重要一点
C.初始化与运行设定的图表
- merge = tf.summary.merge_all()#合并图表2 writer = tf.summary.FileWriter("G:/test/",graph=sess.graph)#写进文件3 result = sess.run(merge,feed_dict={ xs:x_data,ys:y_data})#运行打包的图表merge4 writer.add_summary(result,i)#写入文件,并且单步长50
完整代码及显示效果:
- import tensorflow as tf
- import numpy as np
- import matplotlib.pyplot as plt
- def add_layer(inputs , in_size , out_size , n_layer = 1 , activate = None):
- layer_name = "layer" + str(n_layer)
- with tf.name_scope(layer_name):
- with tf.name_scope("Weights"):
- Weights = tf.Variable(tf.random_normal([in_size,out_size]),name="W")#随机初始化
- tf.summary.histogram(layer_name+"Weight",Weights)
- with tf.name_scope("Baises"):
- baises = tf.Variable(tf.zeros([1,out_size])+0.1,name="B")#可以随机但是不要初始化为0,都为固定值比随机好点
- tf.summary.histogram(layer_name+"Baises",baises)
- y = tf.matmul(inputs, Weights) + baises #matmul:矩阵乘法,multipy:一般是数量的乘法
- if activate:
- y = activate(y)
- tf.summary.histogram(layer_name+"y_sum",y)
- return y
- if __name__ == '__main__':
- x_data = np.linspace(-1,1,300,dtype=np.float32)[:,np.newaxis]#创建-1,1的300个数,此时为一维矩阵,后面转化为二维矩阵===[1,2,3]-->>[[1,2,3]]
- noise = np.random.normal(0,0.05,x_data.shape).astype(np.float32)#噪声是(1,300)格式,0-0.05大小
- y_data = np.square(x_data) - 0.5 + noise #带有噪声的抛物线
- fig = plt.figure('show_data')# figure("data")指定图表名称
- ax = fig.add_subplot(111)
- ax.scatter(x_data,y_data)
- plt.ion()
- plt.show()
- with tf.name_scope("inputs"):
- xs = tf.placeholder(tf.float32,[None,1],name="x_data") #外界输入数据
- ys = tf.placeholder(tf.float32,[None,1],name="y_data")
- l1 = add_layer(xs,1,10,n_layer=1,activate=tf.nn.relu)
- prediction = add_layer(l1,10,1,n_layer=2,activate=None)
- with tf.name_scope("loss"):
- loss = tf.reduce_mean(tf.reduce_sum(tf.square(ys - prediction),reduction_indices=[1]))#误差
- tf.summary.scalar("Loss",loss)
- with tf.name_scope("train_step"):
- train_step = tf.train.GradientDescentOptimizer(0.1).minimize(loss)#对误差进行梯度优化,步伐为0.1
- sess = tf.Session()
- merge = tf.summary.merge_all()#合并
- writer = tf.summary.FileWriter("G:/test/",graph=sess.graph)
- sess.run( tf.global_variables_initializer())
- for i in range(1000):
- sess.run(train_step, feed_dict={ xs: x_data, ys: y_data})#训练
- if i%100 == 0:
- result = sess.run(merge,feed_dict={ xs:x_data,ys:y_data})#运行打包的图表merge
- writer.add_summary(result,i)#写入文件,并且单步长50
主要参考莫凡大大:https://morvanzhou.github.io/
可视化出现问题了,参考这位大神:http://blog.csdn.net/fengying2016/article/details/54289931
责任编辑:庞桂玉 来源: 人工智能爱好者社区 TensorFlow神经网络(责任编辑:休闲)
 自己频繁查询征信不会有什么关系,不会影响以后的信贷活动,但是如果委托其他借贷机构查自己的征信,就会在信用报告上留下记录,不利于以后开展信贷活动。频繁的征信查询会给银行或贷款机构留下不好的印象,他们会认
...[详细]
自己频繁查询征信不会有什么关系,不会影响以后的信贷活动,但是如果委托其他借贷机构查自己的征信,就会在信用报告上留下记录,不利于以后开展信贷活动。频繁的征信查询会给银行或贷款机构留下不好的印象,他们会认
...[详细] 近日油管主ElAnalistaDeBits分享了《地平线:山之召唤》33分钟实机演示。从视频中可以看到美丽的开放世界和游戏玩法,一起来欣赏下吧!实机演示:《地平线:山之召唤》是一款VR动作游戏,已正式
...[详细]
近日油管主ElAnalistaDeBits分享了《地平线:山之召唤》33分钟实机演示。从视频中可以看到美丽的开放世界和游戏玩法,一起来欣赏下吧!实机演示:《地平线:山之召唤》是一款VR动作游戏,已正式
...[详细] 为进一步推进商业信用体系建设,促进企业诚实守信经营。面向企业普及诚信与品牌建设的意义,指导企业加强诚信品牌建设,提升整体竞争力。《信用中国》栏目组致力于大力宣传知名自主品牌,讲好中国品牌故事,提高自主
...[详细]
为进一步推进商业信用体系建设,促进企业诚实守信经营。面向企业普及诚信与品牌建设的意义,指导企业加强诚信品牌建设,提升整体竞争力。《信用中国》栏目组致力于大力宣传知名自主品牌,讲好中国品牌故事,提高自主
...[详细] 今天晚上19:30分就是华为的P50系列旗舰新品发布的时间了,赶在正式发布会开始一个多小时之前,海外爆料大神evleaks 在其推特账户直接公布了这款手机的全部内容,而且非常高清,堪称官方图。从图上可
...[详细]
今天晚上19:30分就是华为的P50系列旗舰新品发布的时间了,赶在正式发布会开始一个多小时之前,海外爆料大神evleaks 在其推特账户直接公布了这款手机的全部内容,而且非常高清,堪称官方图。从图上可
...[详细] 面对疫情导致的运输挑战,中远海运快速开通“陆改水”“海铁联运”服务,全力畅通供应链物流,多措并举保障产业链运转顺畅的同时,助力企业复工复产。疫情期间,中
...[详细]
面对疫情导致的运输挑战,中远海运快速开通“陆改水”“海铁联运”服务,全力畅通供应链物流,多措并举保障产业链运转顺畅的同时,助力企业复工复产。疫情期间,中
...[详细] 今日2月22日),异梦迷城官方微博公布最新游戏宣传MV《时光情人》,《时光情人》由雾里看花CV:张琦)倾情演唱、米嘉玉作词、木木吉作曲,3D冒险RPG《异梦迷城》将于3月11日正式发售,感兴趣的玩家点
...[详细]
今日2月22日),异梦迷城官方微博公布最新游戏宣传MV《时光情人》,《时光情人》由雾里看花CV:张琦)倾情演唱、米嘉玉作词、木木吉作曲,3D冒险RPG《异梦迷城》将于3月11日正式发售,感兴趣的玩家点
...[详细]《BASTARD!!暗黑的破坏神》第2季新角色 Netflix年内上线
 萩原一至原作、经典魔幻后宫系列《BASTARD!!暗黑的破坏神》新动画第二季《地狱的镇魂预定2023年内Netflix上线发布,日前官方公布了新角色声优,一起来了解下。•《BASTARD!!暗黑的破坏
...[详细]
萩原一至原作、经典魔幻后宫系列《BASTARD!!暗黑的破坏神》新动画第二季《地狱的镇魂预定2023年内Netflix上线发布,日前官方公布了新角色声优,一起来了解下。•《BASTARD!!暗黑的破坏
...[详细] 随着时代的发展,互联网技术的飞速发展,在线教育已进入新时代。在线英语教育品牌阿卡索根据专业数据了解到,在中国K12在线教育培训用户城市分布中,一线城市达到39.7%,非一线城市达到60.3%,在社会消
...[详细]
随着时代的发展,互联网技术的飞速发展,在线教育已进入新时代。在线英语教育品牌阿卡索根据专业数据了解到,在中国K12在线教育培训用户城市分布中,一线城市达到39.7%,非一线城市达到60.3%,在社会消
...[详细] 很多中小微企业碰到资金周转不开的时候,会去贷款来维持企业正常运营,其中邮政银行小微易贷就是一款经营性贷款,适合中小微企业融资。考虑到有不少企业主和法人代表对邮政银行小微易贷申请流程不清楚,这里就来简单
...[详细]
很多中小微企业碰到资金周转不开的时候,会去贷款来维持企业正常运营,其中邮政银行小微易贷就是一款经营性贷款,适合中小微企业融资。考虑到有不少企业主和法人代表对邮政银行小微易贷申请流程不清楚,这里就来简单
...[详细]12+512GB 疑似荣耀Magic 3跑分曝光 骁龙888 Plus加持
 进入8月份,一大波新机即将来袭,其中最引人瞩目的非搭载了骁龙888 Plus的机型莫属,安兔兔也在后台发现了一款来自荣耀的骁龙888 Plus新机。这款新机的型号为ELZ-AN20,搭载的是主频3GH
...[详细]
进入8月份,一大波新机即将来袭,其中最引人瞩目的非搭载了骁龙888 Plus的机型莫属,安兔兔也在后台发现了一款来自荣耀的骁龙888 Plus新机。这款新机的型号为ELZ-AN20,搭载的是主频3GH
...[详细]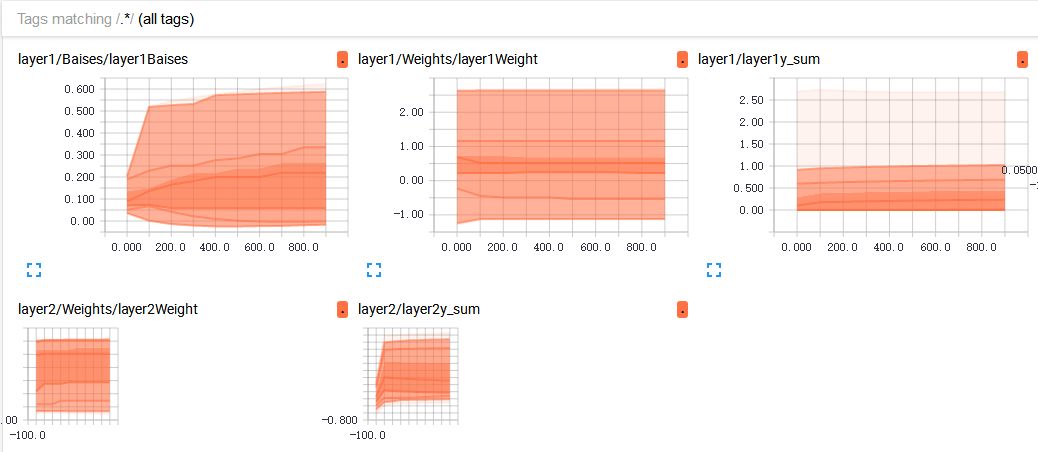
 恒生科技指数跳水 科技股跌幅明显
 倒计时4天
倒计时4天 单日新签9家!尚客优酒店投资公开课长沙、南昌双城告捷
 服务收入有长期增长潜力 多家机构看好联想集团投资机会
 四川省资阳市“项目突破年”大会举行 跑出项目投资“加速度”