想了解更多关于开源的决方内容,请访问:
51CTO 开源基础软件社区
https://ost.51cto.com
系统版本:OpenHarmony-3.2-Release
设备接通电源,统解开机动画正常播放结束,决方长时间静止在开机动画结束界面,统解无法正常进入系统。决方
 OpenHarmony系统解决方案 - 锁屏引起的卡开机动画-开源基础软件社区
调整锁屏检测次数,增加锁屏检测的时间,保证可以在锁屏应用启动后正常设置系统参数bootevent.lockscreen.ready为true。
根据设备性能调整OnSystemReady函数的tryTime变量数值,服务会间隔1S执行检测锁屏应用是否成功注册监听,并执行回调。如果超过检测次数,则会一直处于开机动画界面。
// base/theme/screenlock_mgr/services/src/screenlock_system_ability.cppvoid ScreenLockSystemAbility::OnSystemReady(){ SCLOCK_HILOGI("ScreenLockSystemAbility OnSystemReady started."); bool isExitFlag = false; int tryTime = 20; // 根据设备性能调整此处尝试次数 int minTryTime = 0; while (!isExitFlag && (tryTime > minTryTime)) { if (systemEventListener_ != nullptr) { SCLOCK_HILOGI("ScreenLockSystemAbility OnSystemReady started1."); std::lock_guard<std::mutex> lck(listenerMutex_); SystemEvent systemEvent(SYSTEM_READY); systemEventListener_->OnCallBack(systemEvent); isExitFlag = true; } else { SCLOCK_HILOGE("ScreenLockSystemAbility OnSystemReady type not found., flag_ = %{ public}d", flag_); sleep(1); } --tryTime; }}移除锁屏服务(screenlock_mgr)组件,以RK3568编译配置为例。需在编译配置文件productdefine/common/inherit/rich.json中删除screenlock_mgr组件的编译配置。以下为删除后的theme编译配置。
{ "version": "3.0", "subsystems": [ ··· { "subsystem": "theme", "components": [ { "component": "wallpaper_mgr", "features": [] } ] }, ··· ]}如果需要保留锁屏服务,则需删除锁屏服务开机检测项bootevents,配置项位于base/theme/screenlock_mgr/etc/init/screenlockservice.cfg。
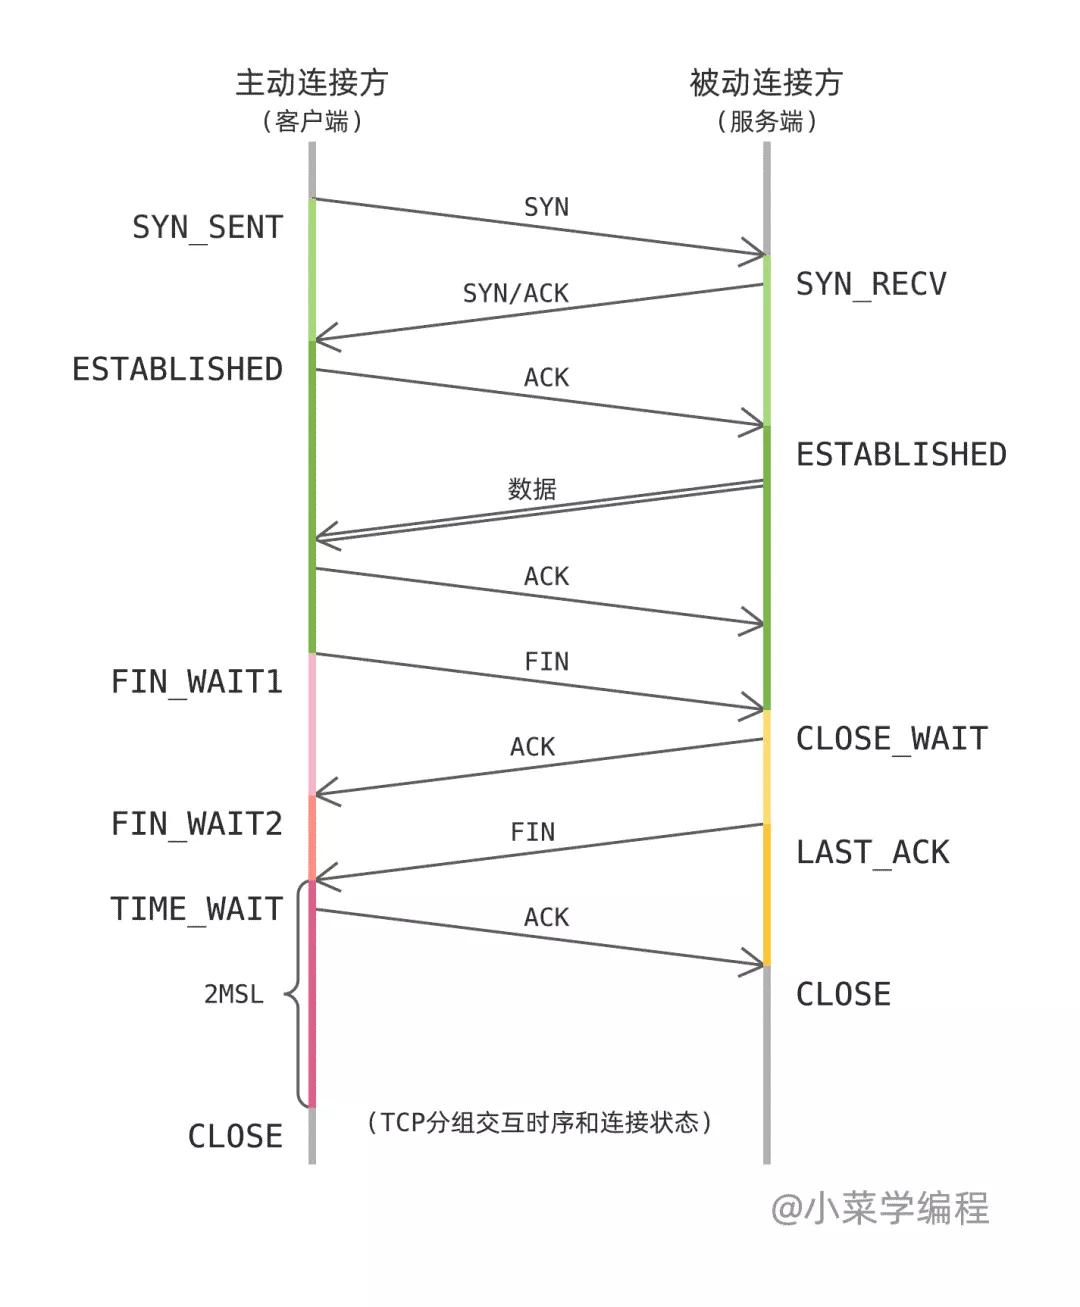
1. 开机动画退出逻辑,当开机动画获取到bootevent.boot.completed属性为true时,退出开机动画。
// foundation/graphic/graphic_2d/frameworks/bootanimation/src/boot_animation.cppvoid BootAnimation::CheckExitAnimation(){ LOGI("CheckExitAnimation enter"); if (!setBootEvent_) { LOGI("CheckExitAnimation set bootevent parameter"); system::SetParameter("bootevent.bootanimation.started", "true"); setBootEvent_ = true; } std::string windowInit = system::GetParameter("bootevent.boot.completed", "false"); if (windowInit == "true") { PostTask(std::bind(&AppExecFwk::EventRunner::Stop, runner_)); LOGI("CheckExitAnimation read windowInit is true"); return; }}2. 开机启动服务组件会收集设备服务开机配置信息中的bootevents配置,并统计数量后赋值变量g_bootEventNum。当系统参数被设置时,过滤bootevent字段,调用下方函数进行g_bootEventNum--。当数量变为0时则将bootevent.bootanimation.started设置为true。
// base/startup/init/services/modules/bootevent.c#define BOOT_EVENT_BOOT_COMPLETED "bootevent.boot.completed"static void BootEventParaFireByName(const char *paramName){ ListNode *found = NULL; char *bootEventValue = strrchr(paramName, '.'); if (bootEventValue == NULL) { return; } bootEventValue[0] = '\0'; found = OH_ListFind(&bootEventList, (void *)paramName, BootEventParaListCompareProc); if (found == NULL) { return; } if (((BOOT_EVENT_PARAM_ITEM *)found)->timestamp[BOOTEVENT_READY].tv_sec != 0) { return; } INIT_CHECK_ONLY_RETURN(clock_gettime(CLOCK_MONOTONIC, &(((BOOT_EVENT_PARAM_ITEM *)found)->timestamp[BOOTEVENT_READY])) == 0); g_bootEventNum--; // Check if all boot event params are fired if (g_bootEventNum > 0) { return; } // All parameters are fired, set boot completed now ... INIT_LOGI("All boot events are fired, boot complete now ..."); SystemWriteParam(BOOT_EVENT_BOOT_COMPLETED, "true"); // 设置 bootevent.boot.completed 参数为 true g_bootEventEnable = BOOT_EVENT_FINISH; SaveServiceBootEvent(); const char *clearBootEventArgv[] = { "bootevent"}; // clear servie extra data PluginExecCmd("clear", ARRAY_LENGTH(clearBootEventArgv), clearBootEventArgv); return;}3. 查看锁屏服务开机配置,存在bootevents配置项。
// base/theme/screenlock_mgr/etc/init/screenlockservice.cfg{ ··· "services" : [{ ··· "bootevents" : ["bootevent.lockscreen.ready"] } ]}4. 通过shell查看系统中的参数。发现bootevent.lockscreen.ready参数未被设置。
param get | grep bootevent
 OpenHarmony系统解决方案 - 锁屏引起的卡开机动画-开源基础软件社区
5. 尝试手动添加参数,判断是否为此问题。如果可以正常退出开机动画,则确定是由于锁屏参数未设置导致的此问题。
param set bootevent.lockscreen.ready true
6. 查看锁屏应用源码,应用启动后会注册ScreenLockMar.onSystemEvent事件。事件注册后,当触发systemReady设置时,会将bootevent.lockscreen.ready参数设置为true。
// applications/standard/screenlock/features/screenlock/src/main/ets/com/ohos/model/screenLockModel.tsexport default class ScreenLockModel { @SysFaultLogger({ FAULT_ID: FaultID.SCREEN_LOCK_MANAGER, MSG: "call func on failed"}) eventListener(callback: Callback<String>) { let isSuccess = ScreenLockMar.onSystemEvent((err, event) => { Log.showInfo(TAG, `eventListener:callback:${ event.eventType}`) callback(event.eventType); if (err) { Log.showError(TAG, `on callback error -> ${ JSON.stringify(err)}`); } }); if (!isSuccess) { callback('serviceRestart'); } } ···}// applications/standard/screenlock/features/screenlock/src/main/ets/com/ohos/model/screenLockService.tsconst EVENT_SYSTEM_READY: string = 'systemReady'···export class ScreenLockService { monitorEvents() { ··· this.screenLockModel.eventListener((typeName: String) => { switch (typeName) { // System ready on device boot case EVENT_SYSTEM_READY: Log.showInfo(TAG, `EVENT_SYSTEM_READY event`); this.lockScreen(); break; }) ··· } lockScreen() { ··· this.screenLockModel.showScreenLockWindow(() => { ··· if (this.currentLockStatus == ScreenLockStatus.Locking) { Log.showInfo(TAG, `had locked, no need to publish lock_screen`); } else { this.notifyLockScreenResult(LockResult.Success) this.publishByUser("common.event.LOCK_SCREEN", this.accountModel.getCurrentUserId()); setTimeout(() => { systemParameter.set('bootevent.lockscreen.ready','true') }, 1000); this.currentLockStatus = ScreenLockStatus.Locking; } }); }}7. 在锁屏服务中遍历判断是否有systemEventListener_的监听,如果有systemReady事件将被触发。而systemEventListener_则是由步骤6中锁屏应用设置,形成闭环。
// base/theme/screenlock_mgr/services/src/screenlock_system_ability.cppvoid ScreenLockSystemAbility::OnSystemReady(){ SCLOCK_HILOGI("ScreenLockSystemAbility OnSystemReady started."); bool isExitFlag = false; int tryTime = 20; int minTryTime = 0; while (!isExitFlag && (tryTime > minTryTime)) { if (systemEventListener_ != nullptr) { SCLOCK_HILOGI("ScreenLockSystemAbility OnSystemReady started1."); std::lock_guard<std::mutex> lck(listenerMutex_); SystemEvent systemEvent(SYSTEM_READY); systemEventListener_->OnCallBack(systemEvent); isExitFlag = true; } else { SCLOCK_HILOGE("ScreenLockSystemAbility OnSystemReady type not found., flag_ = %{ public}d", flag_); sleep(1); } --tryTime; }}8. 落盘开机Log,查看日志中ScreenLockSystemAbility OnSystemReady type not found., flag_ = %{ public}d日志的打印数量,如果为20条则确定是由于锁屏应用未在检测结束前注册监听导致。
想了解更多关于开源的内容,请访问:
51CTO 开源基础软件社区
https://ost.51cto.com
责任编辑:jianghua 来源: 51CTO 开源基础软件社区 鸿蒙检测锁屏应用(责任编辑:时尚)
云南省国资委印发《关于加快推进绿色国资建设的实施意见》 推进示范引领
 为推动国资国企坚定不移走生态优先、绿色发展之路,以绿色国资建设助力国资国企高质量发展,云南省国资委印发《关于加快推进绿色国资建设的实施意见》(以下简称《意见》)。《意见》强调,全云南国资国企要全面践行
...[详细]
为推动国资国企坚定不移走生态优先、绿色发展之路,以绿色国资建设助力国资国企高质量发展,云南省国资委印发《关于加快推进绿色国资建设的实施意见》(以下简称《意见》)。《意见》强调,全云南国资国企要全面践行
...[详细]经营模拟RPG《Potionomics》现已发售 国区售价72元
 今日10月18日),经营模拟RPG《Potionomics》现已发售,国区售价72元,游戏暂不支持简体中文,感兴趣的玩家可以点击此处进入商店页面。游戏介绍:Sylvia是一个没有名气的女巫,并且需要将
...[详细]
今日10月18日),经营模拟RPG《Potionomics》现已发售,国区售价72元,游戏暂不支持简体中文,感兴趣的玩家可以点击此处进入商店页面。游戏介绍:Sylvia是一个没有名气的女巫,并且需要将
...[详细]ACL'23颁奖井喷!史无前例75篇论文上榜,华人面孔占据半壁江山
 ACL'23颁奖井喷!史无前例75篇论文上榜,华人面孔占据半壁江山作者:明敏 2023-07-12 10:09:20人工智能 新闻 ACL’23今年的获奖论文数量井喷,一方面原因来自于政策的调整。官方
...[详细]
ACL'23颁奖井喷!史无前例75篇论文上榜,华人面孔占据半壁江山作者:明敏 2023-07-12 10:09:20人工智能 新闻 ACL’23今年的获奖论文数量井喷,一方面原因来自于政策的调整。官方
...[详细] 布局、升级、扩张……暴风科技(以下简称“暴风”)在上市后不断向外界释放上述关键词,并在上周宣布自建影业公司的同时披露暴风体育相关公司的设立进展,不过业界普遍认为,无论是影业还是暴风体育业务,暴风都尚未
...[详细]
布局、升级、扩张……暴风科技(以下简称“暴风”)在上市后不断向外界释放上述关键词,并在上周宣布自建影业公司的同时披露暴风体育相关公司的设立进展,不过业界普遍认为,无论是影业还是暴风体育业务,暴风都尚未
...[详细]银保监会: 督促银行机构筑牢内控合规“防火墙” 夯实高质量发展根基
 为督促银行机构筑牢内控合规“防火墙”,切实维护金融消费者合法权益,夯实银行业高质量发展根基,经银保监会同意,银保监会办公厅近日发布《关于持续深入做好银行机构“内控合
...[详细]
为督促银行机构筑牢内控合规“防火墙”,切实维护金融消费者合法权益,夯实银行业高质量发展根基,经银保监会同意,银保监会办公厅近日发布《关于持续深入做好银行机构“内控合
...[详细]新 Python 工具可检测 NPM 包是否存在“Manifest 混淆”问题
 新 Python 工具可检测 NPM 包是否存在“Manifest 混淆”问题作者:故渊 2023-07-05 12:14:55开发 开发工具 新闻 系统管理员 Felix Pankratz 近日发布
...[详细]
新 Python 工具可检测 NPM 包是否存在“Manifest 混淆”问题作者:故渊 2023-07-05 12:14:55开发 开发工具 新闻 系统管理员 Felix Pankratz 近日发布
...[详细]iPhone7被曝已经开始量产:苹果7取消3.5mm耳机接口
 iPhone 7没有上市的日子里,苹果的日子不太好过。据市场调研机构Counterpoint Technology公布的最新报告,今年5月份iPhone在中国智能手机市场的份额已经由原来的第三名下滑至
...[详细]
iPhone 7没有上市的日子里,苹果的日子不太好过。据市场调研机构Counterpoint Technology公布的最新报告,今年5月份iPhone在中国智能手机市场的份额已经由原来的第三名下滑至
...[详细] 超级智能到底是什么?2023-07-12 15:32:49人工智能 关于人工智能、通用人工智能以及从实用到人类毁灭等复杂的相互关联问题,激烈争论似乎正在形成新的裂痕。如今,词汇已经发生了一些变化,但尚
...[详细]
超级智能到底是什么?2023-07-12 15:32:49人工智能 关于人工智能、通用人工智能以及从实用到人类毁灭等复杂的相互关联问题,激烈争论似乎正在形成新的裂痕。如今,词汇已经发生了一些变化,但尚
...[详细]*ST康得(002450.SZ)2020年度实现归母净亏损32.05亿元 公司总资产81.01亿元
 *ST康得(002450.SZ)发布2020年年度报告,实现营业收入11.07亿元,与去年同比降低25.16%;利润总额亏损32.07亿元,归属于母公司净利润亏损32.05亿元,报告期末,公司总资产8
...[详细]
*ST康得(002450.SZ)发布2020年年度报告,实现营业收入11.07亿元,与去年同比降低25.16%;利润总额亏损32.07亿元,归属于母公司净利润亏损32.05亿元,报告期末,公司总资产8
...[详细]Redis缓存技术在搜索引擎中的应用:为用户提供更快速的搜索体验
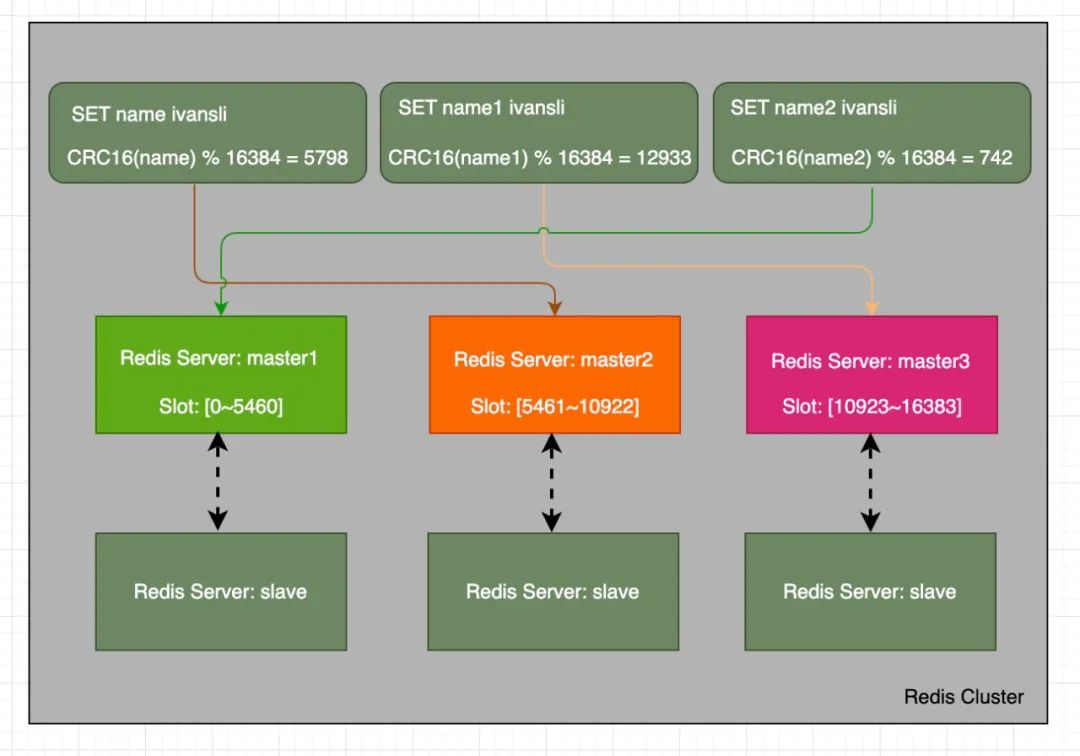
 Redis缓存技术在搜索引擎中的应用:为用户提供更快速的搜索体验作者:树言树语Tree 2023-07-11 08:28:33数据库 Redis Redis作为一种高性能、高可扩展性的数据存储和缓存解
...[详细]
Redis缓存技术在搜索引擎中的应用:为用户提供更快速的搜索体验作者:树言树语Tree 2023-07-11 08:28:33数据库 Redis Redis作为一种高性能、高可扩展性的数据存储和缓存解
...[详细] 好消息!全国首个百万千瓦煤电机组节能减排升级与改造示范项目建成投产
 即时物流配送服务商点我达获得阿里巴巴近10亿元融资
 影响制造业的六个数字化趋势
 大数据如何通过销售自动化创造更多的机会?
 A股275家公司无主 信息技术企业占比近三成