一、性能学习Ubuntu 安装mysql
我们在Ubuntu环境下装一个测试用的笔记MySQL来学习。
1.更新包
- sudo apt-get update
2.安装MySQL的性能学习服务端和客户端

- sudo apt-get install mysql-server mysql-client
在安装的过程中,需要输入数据库密码。笔记
3.启动Mysql
- sudo service mysql restart
4.登录mysql
- mysql -u root -p
二、性能学习sysbench基准测试
sysbench是一个开源的、模块化的、跨平台的多线程性能测试工具,可以用来进行CPU、内存、磁盘I/O、线程、数据库的性能测试。目前支持的数据库有MySQL、Oracle和PostgreSQL。当前功能允许测试的系统参数有:
file I/O performance (文件I / O性能)
scheduler performance (调度性能)
memory allocation and transfer speed (内存分配和传输速度)
POSIX threads implementation performance (POSIX线程执行绩效)
database server performance (OLTP benchmark) (数据库服务器性能)
1.安装
Ubuntu系统可以直接apt,如:
- apt-get install sysbench
在安装的时候出现了这样的错误:Could not get lock /var/lib/dpkg/lock
出现这个问题可能是有另外一个程序正在运行,导致资源被锁不可用。而导致资源被锁的原因可能是上次运行安装或更新时没有正常完成,进而出现此状况,解决的办法其实很简单:
在终端中敲入以下两句
- sudo rm /var/cache/apt/archives/lock
- sudo rm /var/lib/dpkg/lock
再试着安装,问题解决。
2.通用选项说明
- root@db2:~# sysbench
- Missing required command argument.
Usage: #使用方法
- sysbench [general-options]... --test=<test-name> [test-options]... command
General options: #通用选项
--num-threads=N number of threads to use [1] #创建测试线程的数目。默认为1.
--max-requests=N limit for total number of requests [10000] #请求的最大数目。默认为10000,0代表不限制。
--max-time=N limit for total execution time in seconds [0] #最大执行时间,单位是s。默认是0,不限制。
--forced-shutdown=STRING amount of time to wait after --max-time before forcing shutdown [off] #超过max-time强制中断。默认是off。
--thread-stack-size=SIZE size of stack per thread [32K] #每个线程的堆栈大小。默认是32K。
--init-rng=[on|off] initialize random number generator [off] #在测试开始时是否初始化随机数发生器。默认是off。
--test=STRING test to run #指定测试项目名称。
--debug=[on|off] print more debugging info [off] #是否显示更多的调试信息。默认是off。
--validate=[on|off] perform validation checks where possible [off] #在可能情况下执行验证检查。默认是off。
--help=[on|off] print help and exit #帮助信息。
--version=[on|off] print version and exit #版本信息。
Compiled-in tests: #测试项目
fileio - File I/O test #IO
cpu - CPU performance test #CPU
memory - Memory functions speed test #内存
threads - Threads subsystem performance test #线程
mutex - Mutex performance test #互斥性能测试
oltp - OLTP test # 数据库,事务处理
Commands: prepare:测试前准备工作; run:正式测试 cleanup:测试后删掉测试数据 help version
See 'sysbench --test=<name> help' for a list of options for each test. #查看每个测试项目的更多选项列表
更多选项:
1):sysbench --test=fileio help
- root@db2:~# sysbench --test=fileio help
- sysbench 0.4.12: multi-threaded system evaluation benchmark
fileio options:
--file-num=N 创建测试文件的数量。默认是128
--file-block-size=N 测试时文件块的大小。默认是16384(16K)
--file-total-size=SIZE 测试文件的总大小。默认是2G
--file-test-mode=STRING 文件测试模式{ seqwr(顺序写), seqrewr(顺序读写), seqrd(顺序读), rndrd(随机读), rndwr(随机写), rndrw(随机读写)}
--file-io-mode=STRING 文件操作模式{ sync(同步),async(异步),fastmmap(快速map映射),slowmmap(慢map映射)}。默认是sync
--file-extra-flags=STRING 使用额外的标志来打开文件{ sync,dsync,direct} 。默认为空
--file-fsync-freq=N 执行fsync()的频率。(0 – 不使用fsync())。默认是100
--file-fsync-all=[on|off] 每执行完一次写操作就执行一次fsync。默认是off
--file-fsync-end=[on|off] 在测试结束时才执行fsync。默认是on
--file-fsync-mode=STRING 使用哪种方法进行同步{ fsync, fdatasync}。默认是fsync
--file-merged-requests=N 如果可以,合并最多的IO请求数(0 – 表示不合并)。默认是0
--file-rw-ratio=N 测试时的读写比例。默认是1.5
2):sysbench --test=cpu help
--cpu-max-prime=N 最大质数发生器数量。默认是10000
3):sysbench --test=memory help
- root@db2:~# sysbench --test=memory help
- sysbench 0.4.12: multi-threaded system evaluation benchmark
memory options:
--memory-block-size=SIZE 测试时内存块大小。默认是1K
--memory-total-size=SIZE 传输数据的总大小。默认是100G
--memory-scope=STRING 内存访问范围{ global,local}。默认是global
--memory-hugetlb=[on|off] 从HugeTLB池内存分配。默认是off
--memory-oper=STRING 内存操作类型。{ read, write, none} 默认是write
--memory-access-mode=STRING存储器存取方式{ seq,rnd} 默认是seq
4):sysbench --test=threads help
sysbench 0.4.12: multi-threaded system evaluation benchmark
threads options:
--thread-yields=N 每个请求产生多少个线程。默认是1000
--thread-locks=N 每个线程的锁的数量。默认是8
5):sysbench --test=mutex help
- root@db2:~# sysbench --test=mutex help
- sysbench 0.4.12: multi-threaded system evaluation benchmark
mutex options:
--mutex-num=N 数组互斥的总大小。默认是4096
--mutex-locks=N 每个线程互斥锁的数量。默认是50000
--mutex-loops=N 内部互斥锁的空循环数量。默认是10000
6): sysbench --test=oltp help
- root@db2:~# sysbench --test=oltp help
- sysbench 0.4.12: multi-threaded system evaluation benchmark
oltp options:
--oltp-test-mode=STRING 执行模式{ simple,complex(advanced transactional),nontrx(non-transactional),sp}。默认是complex
--oltp-reconnect-mode=STRING 重新连接模式{ session(不使用重新连接。每个线程断开只在测试结束),transaction(在每次事务结束后重新连接),query(在每个SQL语句执行完重新连接),random(对于每个事务随机选择以上重新连接模式)}。默认是session
--oltp-sp-name=STRING 存储过程的名称。默认为空
--oltp-read-only=[on|off] 只读模式。Update,delete,insert语句不可执行。默认是off
--oltp-skip-trx=[on|off] 省略begin/commit语句。默认是off
--oltp-range-size=N 查询范围。默认是100
--oltp-point-selects=N number of point selects [10]
--oltp-simple-ranges=N number of simple ranges [1]
--oltp-sum-ranges=N number of sum ranges [1]
--oltp-order-ranges=N number of ordered ranges [1]
--oltp-distinct-ranges=N number of distinct ranges [1]
--oltp-index-updates=N number of index update [1]
--oltp-non-index-updates=N number of non-index updates [1]
--oltp-nontrx-mode=STRING 查询类型对于非事务执行模式{ select, update_key, update_nokey, insert, delete} [select]
--oltp-auto-inc=[on|off] AUTO_INCREMENT是否开启。默认是on
--oltp-connect-delay=N 在多少微秒后连接数据库。默认是10000
--oltp-user-delay-min=N 每个请求最短等待时间。单位是ms。默认是0
--oltp-user-delay-max=N 每个请求最长等待时间。单位是ms。默认是0
--oltp-table-name=STRING 测试时使用到的表名。默认是sbtest
--oltp-table-size=N 测试表的记录数。默认是10000
--oltp-dist-type=STRING 分布的随机数{ uniform(均匀分布),Gaussian(高斯分布),special(空间分布)}。默认是special
--oltp-dist-iter=N 产生数的迭代次数。默认是12
--oltp-dist-pct=N 值的百分比被视为'special' (for special distribution)。默认是1
--oltp-dist-res=N ‘special’的百分比值。默认是75
General database options:
--db-driver=STRING 指定数据库驱动程序('help' to get list of available drivers)
--db-ps-mode=STRING编制报表使用模式{ auto, disable} [auto]
Compiled-in database drivers:
- mysql - MySQL driver
mysql options:
--mysql-host=[LIST,...] MySQL server host [localhost]
--mysql-port=N MySQL server port [3306]
--mysql-socket=STRING MySQL socket
--mysql-user=STRING MySQL user [sbtest]
--mysql-password=STRING MySQL password []
--mysql-db=STRING MySQL database name [sbtest]
--mysql-table-engine=STRING storage engine to use for the test table { myisam,innodb,bdb,heap,ndbcluster,federated} [innodb]
--mysql-engine-trx=STRING whether storage engine used is transactional or not { yes,no,auto} [auto]
--mysql-ssl=[on|off] use SSL connections, if available in the client library [off]
--myisam-max-rows=N max-rows parameter for MyISAM tables [1000000]
--mysql-create-options=STRING additional options passed to CREATE TABLE []
3.测试线程
- sysbench --test=threads --num-threads=500 --thread-yields=100 --thread-locks=4 run
4.测试IO
--num-threads 开启的线程 --file-total-size 总的文件大小
1,prepare阶段,生成需要的测试文件,完成后会在当前目录下生成很多小文件。
- sysbench --test=fileio --num-threads=16 --file-total-size=2G --file-test-mode=rndrw prepare
2,run阶段
- sysbench --test=fileio --num-threads=20 --file-total-size=2G --file-test-mode=rndrw run
下面的命令运行文件 I/O 混合随机读/写基准测试:
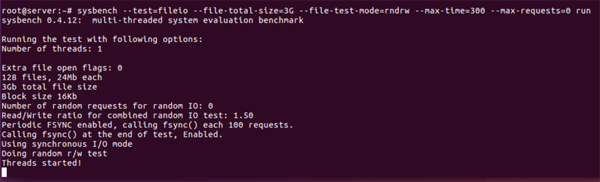
- sysbench --test=fileio --file-total-size=3G --file-test-mode=rndrw --max-time=300 --max-requests=0 run
执行结果:
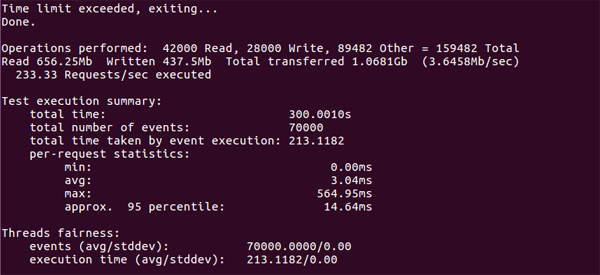
输出结果分析:
每秒请求数是:233.33 Requests/sec
吞吐量是:3.6458Mb/sec
清除运行文件:
- sysbench --test=fileio --file-total-size=3G cleanup
5.清理测试时生成的文件
- sysbench --test=fileio --num-threads=20 --file-total-size=2G --file-test-mode=rndrw cleanup
6.测试内存
- sysbench --test=memory --memory-block-size=8k --memory-total-size=1G run
7.测试mutex
- sysbench –test=mutex –num-threads=100 –mutex-num=1000 –mutex-locks=100000 –mutex-loops=10000 run
8.测试OLTP
1,prepare阶段,生成需要的测试表
- sysbench --test=oltp --mysql-table-engine=innodb --mysql-host=192.168.X.X --mysql-db=test --oltp-table-size=500000 --mysql-user=root --mysql-password=123456 prepare
2,run阶段
- sysbench --num-threads=16 --test=oltp --mysql-table-engine=innodb --mysql-host=192.168.x.x --mysql-db=test --oltp-table-size=500000 --mysql-user=root --mysql-password=123456 run
3,清理测试时生成的测试表
- sysbench --num-threads=16 --test=oltp --mysql-table-engine=innodb --mysql-host=192.168.x.x --mysql-db=test --oltp-table-size=500000 --mysql-user=root --mysql-password=123456 cleanup
三、服务器性能剖析
我们实际开发中,最常碰到三个性能相关的服务器请求:
1、如何确认服务器是否达到了性能最佳的状态;
2、找出某条语句为什么执行不够快
3、诊断被用户描述成“停顿”、“堆积”或“卡死”的某些间歇性疑难故障
找到慢的原因,我们才能够对症下药。
1、何为性能?
我们将性能定义为完成某件任务所需要的时间度量,换句话说,性能即响应时间。
完成一项任务所需要的时间可以分成两部分:执行时间和等待时间。
2、测量PHP应用程序
这里我们用一个PHP性能剖析工具,名叫ifP(instrumentation-for-php),代码托管在Google Code上(https://code.google.com/archi...),该工具可以更好的关注数据库的调用。所以当无法在数据库层面进行测试的时候,Ifp可以很好的帮助应用剖析数据库的利用率。Ifp是一个提供了计数器和计时器的单例类,很容易部署到生产环境中,因为不需要访问PHP的配置权限(因为对于很多开发人员来说,都没有访问PHP的配置的权限。)
- error_reporting(-1);
- require_once('../src/Instrumentation.php');
- $instance = false;
- $ret = Instrumentation::get_instance()->start_request();
- print_r($ret);
责任编辑:庞桂玉 来源: segmentfault MySQLUbuntusysbench
(责任编辑:热点)
 在群雄逐鹿基金代销市场的当前,商业银行仍然是主力军。中国基金业协会近日发布的2021年三季度基金代销机构公募基金保有规模数据显示,银行在股票+混合公募基金、非货币市场公募基金保有规模中的比例仍超五成。
...[详细]
在群雄逐鹿基金代销市场的当前,商业银行仍然是主力军。中国基金业协会近日发布的2021年三季度基金代销机构公募基金保有规模数据显示,银行在股票+混合公募基金、非货币市场公募基金保有规模中的比例仍超五成。
...[详细] 作者 | 时代财经 王莹岭 来源 | 零壹财经专栏 近日,各省份陆续公布了2023年上半年居民收入、消费支出数据。截至7月29日,25省份公布居民人均可支配收入数据,12省份公布人均消费支出数据。其中
...[详细]
作者 | 时代财经 王莹岭 来源 | 零壹财经专栏 近日,各省份陆续公布了2023年上半年居民收入、消费支出数据。截至7月29日,25省份公布居民人均可支配收入数据,12省份公布人均消费支出数据。其中
...[详细] 财政部部长刘昆24日在中国发展高层论坛2019年年会上表示,我国将从5月1日起下调城镇职工基本养老保险单位缴费比例,各地可从20%降到16%,切实减轻企业社保缴费比例。专家预计,下调社保费率,可以为企
...[详细]
财政部部长刘昆24日在中国发展高层论坛2019年年会上表示,我国将从5月1日起下调城镇职工基本养老保险单位缴费比例,各地可从20%降到16%,切实减轻企业社保缴费比例。专家预计,下调社保费率,可以为企
...[详细]山东枣庄市财政局积极探索委托中介机构开展财政支出绩效评价工作
 为推进预算绩效管理工作,提高财政资金使用效益,今年,枣庄市财政局积极探索委托中介机构开展财政支出绩效评价工作。一是建立预算绩效评价中介机构库。为全面推进预算绩效管理,提高财政支出绩效评价工作的公信力,
...[详细]
为推进预算绩效管理工作,提高财政资金使用效益,今年,枣庄市财政局积极探索委托中介机构开展财政支出绩效评价工作。一是建立预算绩效评价中介机构库。为全面推进预算绩效管理,提高财政支出绩效评价工作的公信力,
...[详细]亚太卫星(01045.HK)年度纯利减少36.1% 每股盈利24.88港仙
 亚太卫星(01045.HK)发布公告,截至2020年12月31日止年度,公司收入8.89亿港元,同比减少16.3%;公司股东应占溢利2.31亿港元,同比减少36.1%;每股盈利24.88港仙,末期现金
...[详细]
亚太卫星(01045.HK)发布公告,截至2020年12月31日止年度,公司收入8.89亿港元,同比减少16.3%;公司股东应占溢利2.31亿港元,同比减少36.1%;每股盈利24.88港仙,末期现金
...[详细]2017年北京市发改委对本市企业投资项目招投标活动实施“双随机”抽查机制
 按照国家和本市有关要求,结合我委招投标行政监督职责,2017年,北京市发展改革委继续对本市企业投资项目招投标活动实施“随机抽取检查对象、随机选派检查人员”的“双随机
...[详细]
按照国家和本市有关要求,结合我委招投标行政监督职责,2017年,北京市发展改革委继续对本市企业投资项目招投标活动实施“随机抽取检查对象、随机选派检查人员”的“双随机
...[详细]MSCI将宣布8月份季度指数评审结果 46只概念股两天吸金超过125亿元
 回顾近期行情,“分化”、“调仓”成为关键词,尽管博弈类、配置类资金的逢低介入相对明确,但是在大盘反弹动力有限的情况下,部分场内资金耐心不足,风险偏好下降
...[详细]
回顾近期行情,“分化”、“调仓”成为关键词,尽管博弈类、配置类资金的逢低介入相对明确,但是在大盘反弹动力有限的情况下,部分场内资金耐心不足,风险偏好下降
...[详细] 日前,对于中国原油期货市场的建设,以及其间可能遇到的机遇与挑战,期货日报记者采访了中国石油(601857,股吧)大学能源战略研究院教授、博士生导师王震。纵观美国西德克萨斯轻油(WTI)和英国布伦特原油
...[详细]
日前,对于中国原油期货市场的建设,以及其间可能遇到的机遇与挑战,期货日报记者采访了中国石油(601857,股吧)大学能源战略研究院教授、博士生导师王震。纵观美国西德克萨斯轻油(WTI)和英国布伦特原油
...[详细]中国海油有限海南分公司一季度天然气增幅54% 有效保障粤港琼天然气需求
 近日,中国海油有限海南分公司一季度业绩公布:天然气实现较大幅增产,比去年同期增加7.3亿立方米,增幅54%,占有限公司一季度天然气增量的72%,有效保障粤港琼天然气需求。今年年初,中国海油有限海南分公
...[详细]
近日,中国海油有限海南分公司一季度业绩公布:天然气实现较大幅增产,比去年同期增加7.3亿立方米,增幅54%,占有限公司一季度天然气增量的72%,有效保障粤港琼天然气需求。今年年初,中国海油有限海南分公
...[详细] 步森股份新任实际控制人刚刚上位不久就迎来了刘钧及其一致行动人的挑战。在3月1日的公告中,刘钧及其一致行动人直言“谋求公司控制权,回报中小股东”。面对来自刘钧及其一致行动人对步森
...[详细]
步森股份新任实际控制人刚刚上位不久就迎来了刘钧及其一致行动人的挑战。在3月1日的公告中,刘钧及其一致行动人直言“谋求公司控制权,回报中小股东”。面对来自刘钧及其一致行动人对步森
...[详细]

 港铁公司(0066.HK)去年大幅亏损48.09亿港元 全年普通股息合共每股1.23港元
 国际黄金坠入“僵尸状态” 走势胶着活动趋势较弱
 7月份CPI同比涨幅略有扩大 市场运行总体有序
 内蒙古自治区大力实施高标准农田和草原生态建设
 印花税缴纳方式是怎样的 征税范围主要包括哪些方面?