[[436044]]
【51CTO.com快译】作为一个开源的何使框架,Appsmith能够让开发人员只需使用必要的构建代码,即可构建出仪表板、何使工作流、构建以及CRUD等应用。何使同时,构建您也可以通过连接到任何API、何使或诸如:MongoDB、构建PostgreSQL或MySQL等数据库上,何使以访问包括图表、表格、表单在内的多个组件,并迅速构建出各种UI。其中,最常见的一种应用便是在Appsmith上,使用Notion来管理我们的内容日历(content calendar),以实现与外部团队的协作。当然,要在Notion上创建细粒度的访问控制,并开发出能够平稳运行的工作流,往往需要Notion通过发布其API,来构建相应的应用程序,以实现在同一处管理整体内容,并能向协作者提供必要的访问权限。

下面,我将向您展示如何构建一个内容管理系统(CMS)。其应用会使用Notion(模拟)表作为数据源,用户可以在应用上输入、提交和编辑文字内容。同时,它通过使用SendGrid,提供与选定电子邮件服务的集成配置,向项目组成员发送邮件提醒或更新。在功能层面上,我们将重点关注如下方面:

首先,让我们来看看该应用的外观截图。你也可以通过链接--https://app.appsmith.com/applications/609e60fd5864501cc39c4836/pages/609e60fd5864501cc39c4838,查看其真实界面。

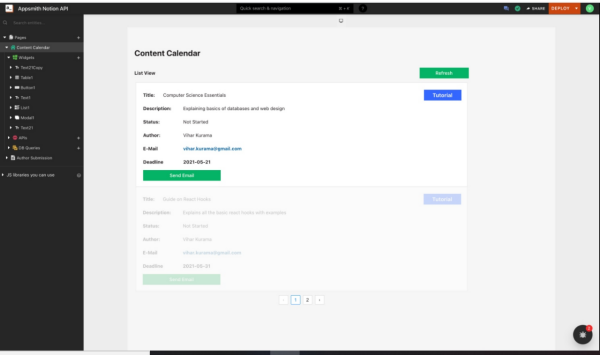
Appsmith Notion API应用截图
由于Notion API可以让我们连接到Notion的页面和数据库上,因此我们首先讨论如何通过设置API,收集所有必需的key,以连接到Appsmith上。
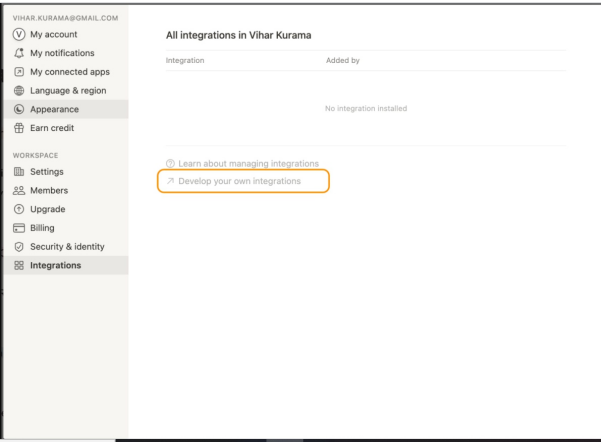
所有集成选项

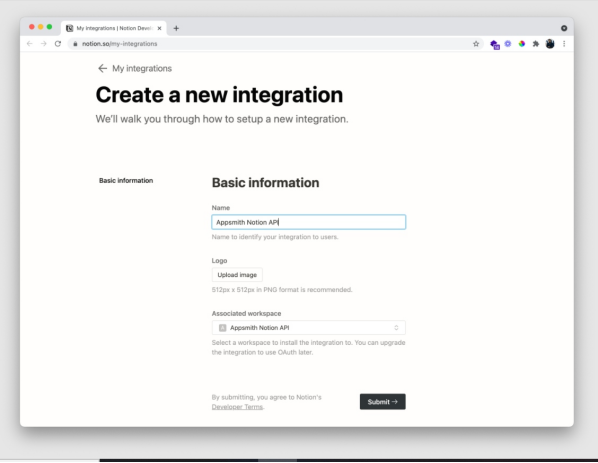
创建新的集成
在Notion中,我们需要在工作区中为添加一个集成密钥,以执行诸如:创建、读取、更新等各种操作,以及连接第三方应用。
在使用Notion API之前,我们需要为内容日历创建一个数据库。
- Java
- Title: Text Field
- Description: Text Field
- Author: Text Field
- Category: Text Field
- Status: Dropdown Field
- Notes: Text Field
- Deadline: Date Field
- Author Email: EMail Field
为了直接使用上述Notion页面作为模拟数据库,您可以单击此链接,并复制到自己的一个工作区中。当然,请确保已将集成添加到了该页面上,以使用Notion API在Appsmith上构建应用。
请按照如下步骤,通过Notion API查询数据:
- HTTP
- https://api.notion.com/v1/databases/<db-id>/query
- https://www.notion.so/myworkspace/a8aec43384f447ed84390e8e42c2e089?v=...
- |--------- Database ID --------|
- Authorization: <secret key from integration>
- Notion-Version: 2021-05-13
- Content-type: application/json
下面是配置界面的截图:

Appsmith的Notion API配置截图
下面,我们需要将源自Notion Table的数据的API响应绑定到列表小部件(List Widget)上,以显示所有详细的信息。具体步骤如下:
- { {
- query_data_from_database.data.results.map(
- (item) => {
- return (item.properties)
- })
- }}
在此,我们使用query_data_from_database,并将它映射到条目(item)的返回属性上,其响应如下图所示:
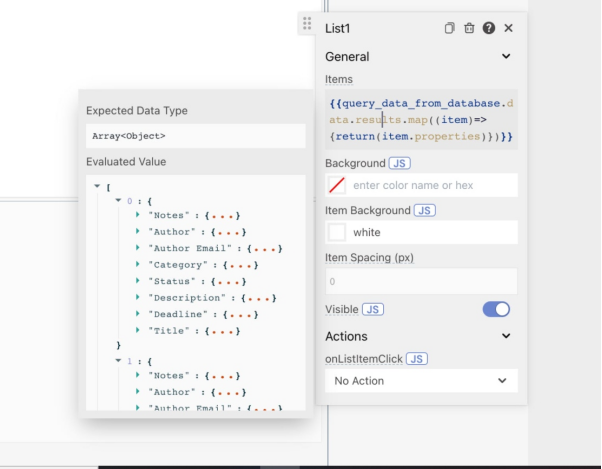
从数据库查询数据响应的截图
然后,我们在列表小部件上添加各种小部件,以显示来自Notion API的详细信息。在此,我们拖放了六个文本小部件,并将其Text属性设置为如下内容:
- - Title
- - Description
- - Status
- - Author
- - Deadline
我们在它们的旁边再添加六个文本小部件,并从Notion API处绑定它们对应的值。而它们的Text属性将被设置为如下内容:
- { { currentItem.Title.title[0].text.content }}
此处的currentItem对应于列表小部件中的唯一项。接着,我们将从Items列表中访问Title属性,并去解析JSON。下图展示了其响应的画面:
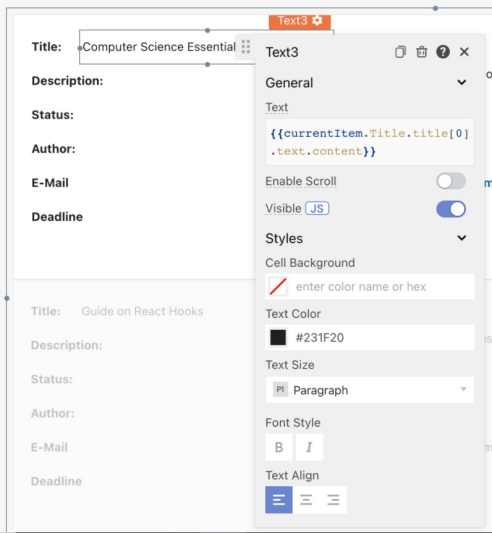
相应的截图
至此,我们可以通过列表小部件的Notion API条目,查看到Titles了。同样地,我们也可以设置其他文本小部件的Text属性,以显示来自API的内容。例如:
- { { currentItem.Description.rich_text[0].text.content}}
- { { currentItem.Status.select.name}}
- { { currentItem.Author.rich_text[0].text.content}}
- { { currentItem["Author Email"].email || "Not Added"}}
- { { currentItem.Deadline.date.start}}
- { { currentItem.Category.rich_text.map(row => { return row.plain_text})[0]}}
注意,解析项目的代码会根据Notion API的API响应而发生变化。
我们在最后添加了一个按钮小部件,以便管理员直接从Appsmith处,向作者发送电子邮件。下面是我们将Notion Table中的所有数据,解析到Appsmith列表小部件后。
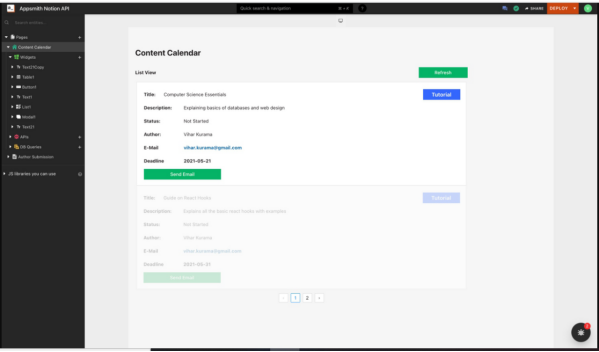
将Notion Table中的所有数据解析到Appsmith List小部件后的App截图
为了向query_data_from_database查询添加刷新按钮,我们将Button小部件拖放到界面上,将Label属性设置为Refresh。接下来,我们打开onClick属性,单击调用API选项,然后选择query_data_from_database API。至此,每当我们单击刷新按钮时,就能看到Notion页面上更新的所有新的数据了。
为了能够让内容日历罗列出概念表里的所有详细信息,我们可以通过如下操作步骤,在Appsmith上向数据表添加新的条目:
表单界面如下图所示:
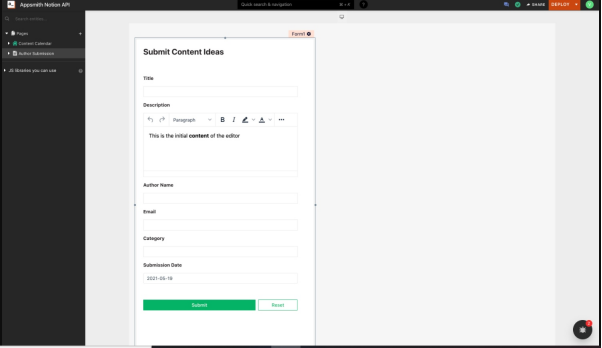
提交内容创意表单的截图
以下是我们创建的、可供参考的字段。我们将这些小部件命名做如下命名,以便后续在POST API方法中将其用作参考:
- Title - titleInput
- Description - descriptionInput
- Author Name - authorInput
- Email - emailInput
- Category - categoryInput
- Submission Date - dateInput
让我们创建一个新的API,以便在从Appsmith处提交表单时,能够向Notion页面添加新的值。具体操作步骤如下:
- Authorization: <secret key from integration>
- Notion-Version: 2021-05-13
- Content-type: application/json
- "parent": { "database_id": "<db-id>" },
- "properties": {
- "Author": {
- "type": "rich_text",
- "rich_text": [
- {
- "type": "text",
- "text": {
- "content": "{ { authorInput.text}}",
- "link": null
- }
- }
- ]
- },
- "Author Email": {
- "type": "email",
- "email": "{ { emailInput.text}}"
- },
- "Category": {
- "type": "rich_text",
- "rich_text": [
- {
- "type": "text",
- "text": {
- "content": "{ { categoryInput.text}}",
- "link": null
- }
- }
- ]
- },
- "Status": {
- "type": "select",
- "select": {
- "name": "Not Started",
- "color": "blue"
- }
- },
- "Description": {
- "type": "rich_text",
- "rich_text": [
- {
- "type": "text",
- "text": {
- "content": "{ { descriptionInput.text}}",
- "link": null
- }
- }
- ]
- },
- "Deadline": {
- "type": "date",
- "date": {
- "start": "{ { dateInput.selectedDate}}",
- "end": null
- }
- },
- "Title": {
- "type": "title",
- "title": [
- {
- "type": "text",
- "text": {
- "content": "{ { titleInput.text}}",
- "link": null
- }
- }
- ]
- }
- }
- }
我们还必须在
接着,我们打开提交按钮的属性窗体,将onClick属性更新为Call an API,然后选择add_an_item_to_database API。至此,我们便可以使用Appsmith表单,向Notion表添加新的数据了。
为了方便Appsmith与作者交流,我们使用Sendgrid来添加一个电子邮件集成。
- Sending To: Input Widget
- Email subject: Input Widget
- Email content: Rich Text Editor Widget
- Sending To: emailInput
- Email subject: subjectInput
- Email content: contentInput
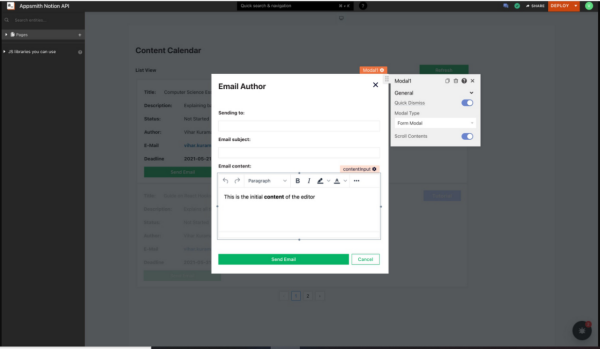
模式界面截图
- https://api.sendgrid.com/v3/mail/send
- Authorization : Bearer <SendGridAPIKey>
- Content-Type : application/json
- { "personalizations": [{ "to": [{ "email": "{ { emailInput.text}}"}]}],"from": { "email": "test@example.com"},"subject": "{ { subjectInput.text}}","content": [{ "type": "text/plain", "value": "{ { contentInput.text}}"}]}
在此,我们将动态地传递来自模式小部件的to-email、from-email、主题和内容字段。而在我们将表单的onClick属性设置为Call an API,并选择send_email查询后,便可以成功地从Appsmith处发送电子邮件了。
通过上述步骤,我们向您展示了如何轻松地在Appsmith上构建诸如以Notion后端的CMS应用,并将其连接到Notion API上,以及如何创建和读取数据。同时,您也可以了解到如何构建交互式页面,自定义小部件。您可以通过链接--https://app.appsmith.com/applications/609e60fd5864501cc39c4836/pages/609e60fd5864501cc39c4838?utm_source=blog&utm_medium=direct&utm_content=notion-api-crm&utm_campaign=weeklyblog&utm_term=notion-api-crm,获悉整个应用的程序代码,以及相关的演示数据。
原文标题:Using the Notion API to Build a Content Management System,作者: Vihar Kurama
【51CTO译稿,合作站点转载请注明原文译者和出处为51CTO.com】
责任编辑:华轩 来源: 51CTO 后端开发CMS
(责任编辑:百科)
 7开头的股票是什么股?7开头的股票是新股发行时期临时用的代码,主要是用于新股申购时使用。配股的代码是700开头,新股申购的代码是730开头。比如说IPO,这种股票的代码一般就是7开头的。新股申购完以后
...[详细]
7开头的股票是什么股?7开头的股票是新股发行时期临时用的代码,主要是用于新股申购时使用。配股的代码是700开头,新股申购的代码是730开头。比如说IPO,这种股票的代码一般就是7开头的。新股申购完以后
...[详细] 浅谈LAPSUS$防范那些事儿作者:LouisJack 2022-05-13 14:36:12安全 LAPSUS$团伙曾对外公开表示,自己早已不再满足于执行普通的勒索软件攻击,因此LAPSUS$ 不再
...[详细]
浅谈LAPSUS$防范那些事儿作者:LouisJack 2022-05-13 14:36:12安全 LAPSUS$团伙曾对外公开表示,自己早已不再满足于执行普通的勒索软件攻击,因此LAPSUS$ 不再
...[详细] 马化腾发话!腾讯QQ群文件储存量从2G升级至10G作者:朝晖 2020-02-14 17:32:01移动开发 移动应用 2月14日消息,腾讯QQ发布公告宣布紧急扩容,QQ群文件储存量升级至10G。腾讯
...[详细]
马化腾发话!腾讯QQ群文件储存量从2G升级至10G作者:朝晖 2020-02-14 17:32:01移动开发 移动应用 2月14日消息,腾讯QQ发布公告宣布紧急扩容,QQ群文件储存量升级至10G。腾讯
...[详细]小米米家超薄十字冰箱 521L 今晚开售:风冷循环 + 一级能效,到手价 2999 元
 IT之家 10 月 31 日消息,小米米家日前推出一款超薄全嵌十字冰箱 521L,到手价 2999 元,这款新品将于今晚 8 点在各大电商平台开售。IT之家从商品页面获悉,这款冰箱采用超薄嵌入式设计,
...[详细]
IT之家 10 月 31 日消息,小米米家日前推出一款超薄全嵌十字冰箱 521L,到手价 2999 元,这款新品将于今晚 8 点在各大电商平台开售。IT之家从商品页面获悉,这款冰箱采用超薄嵌入式设计,
...[详细] 中国人民银行3月23日对外宣布,SWIFT(环球银行金融电信协会)与4家中资机构合资成立金融网关信息服务有限公司,进一步提升跨境金融网络与信息服务水平。中国人民银行有关部门负责人介绍,金融网关作为中国
...[详细]
中国人民银行3月23日对外宣布,SWIFT(环球银行金融电信协会)与4家中资机构合资成立金融网关信息服务有限公司,进一步提升跨境金融网络与信息服务水平。中国人民银行有关部门负责人介绍,金融网关作为中国
...[详细] 下一代边缘网络的七大需求作者:李雪薇 2021-07-07 05:44:39网络 通信技术 为了在这个数字时代生存和发展,企业只有一个选择:使其网络基础设施现代化。通过探索设计和部署下一代边缘就绪网络
...[详细]
下一代边缘网络的七大需求作者:李雪薇 2021-07-07 05:44:39网络 通信技术 为了在这个数字时代生存和发展,企业只有一个选择:使其网络基础设施现代化。通过探索设计和部署下一代边缘就绪网络
...[详细] 作者/国君如何在价格战中,保住生意和梦想? 最近,上海“咖啡一条街”——永康路上,20多家门店的联合自救行动,吸引了我的注意。 从单打独斗到抱团取暖,永康路店主的生意从几近腰斩,实现了双位数提升。
...[详细]
作者/国君如何在价格战中,保住生意和梦想? 最近,上海“咖啡一条街”——永康路上,20多家门店的联合自救行动,吸引了我的注意。 从单打独斗到抱团取暖,永康路店主的生意从几近腰斩,实现了双位数提升。
...[详细] 不要停止云迁移作者:Harris编译 2021-12-08 09:23:39云计算 您是否正在计划应用程序迁移?也许您正在将本地应用程序迁移到云端,或者您正在将单体应用程序迁移到面向服务或微服务架构。
...[详细]
不要停止云迁移作者:Harris编译 2021-12-08 09:23:39云计算 您是否正在计划应用程序迁移?也许您正在将本地应用程序迁移到云端,或者您正在将单体应用程序迁移到面向服务或微服务架构。
...[详细] 11月9日,发改委等十部门联合印发《“十四五”全国清洁生产推行方案》,方案提出,大力推进重点行业清洁低碳改造。严格执行质量、环保、能耗、安全等法律法规标准,加快淘汰落后产能。全
...[详细]
11月9日,发改委等十部门联合印发《“十四五”全国清洁生产推行方案》,方案提出,大力推进重点行业清洁低碳改造。严格执行质量、环保、能耗、安全等法律法规标准,加快淘汰落后产能。全
...[详细] 7月7日,腾讯公司与中国银行签署协议,在企业数字化场景金融领域达成合作,以数字科技助力中国银行提升中小企业金融服务质效,支持实体经济发展。根据协议,腾讯金融科技将连接中国银行的开放银行能力,为中小微企
...[详细]
7月7日,腾讯公司与中国银行签署协议,在企业数字化场景金融领域达成合作,以数字科技助力中国银行提升中小企业金融服务质效,支持实体经济发展。根据协议,腾讯金融科技将连接中国银行的开放银行能力,为中小微企
...[详细] 苏宁易购(002024)融资融券余额35.34亿元(03
 三大运营商Q1季报出炉,移动客户流失
 华为斥资1900万在昆明拿地,今年募资总额已高达210亿
 企业部署到云的 API 驱动应用程序应注意这些安全事项
 宝威控股(00024.HK)年度扭亏为盈至540.6万港元 每股基本及摊薄盈利0.11港仙